
Running Elections (draft)
Elections Overview
It is in a group's best interest that elections be fully managed on Rubric, for situations when results must be reviewed and verified. The platform has a variety of settings to ensure that voters can democratically engage with their clubs, and that individuals overseeing the elections can abide by processes outlined in a group's constitution.
For a deeper understanding of democratic procedures and how to abide by student group policies when conducting an election/byelection, refer to these resources.
Creating an Election
-
Login to your student account via hellorubric.com
-
Click the “Login” drop-down and select Student Portal. Login with your student email and appropriate password.
-
Note that, you must be assigned an executive role with election permissions (campaign feature & membership) on Rubric to be able to complete this task.
-
-
On the top navigation bar, click on Elections. You will be taken to the Elections Manager Overview page.
-
To see past elections and data, scroll down to the table at the bottom of the page.
-
To create a new election, click on the “Create Election” button on the top-right of the screen.
-
It will appear in the Active Elections table at the top of this page for future edits once launched.
-
-
-
Input the basic Election Information to create your election.
-
This includes the name of the election. We recommend the following:
-
[Club Name]: [Election Type] - Semester, Year
-
Election types are typically annual or byelection.
-
For example, Lettuce Club: Annual Elections - Fall 2025
-
-
-
The time window for voting. Including the start and end dates.
-
The results release date.
-
-
For advanced options, there are two additional settings. We highly recommend both be set to true, by clicking on the icons until they are checkmarked.
One Win Per Candidate Regardless of the format of your ballot, one win per candidate ensures that one person cannot win the majority for more than one position. Anonymous Votes When a vote is casted, no person (administrative or otherwise) can view the information of the voter. Once turned on, this feature cannot be undone. -
Proceed to the (optional) voter group settings. This will allow you to create cohorts of voters that can then be assigned certain votes limited to their group. Some examples are as follows:
-
-
A delegate representing an off-branching student group represented on your council should only be voted on by members of that branching organization.
-
A first year representative vote should only be available to members in the First Year voter group.
-
-
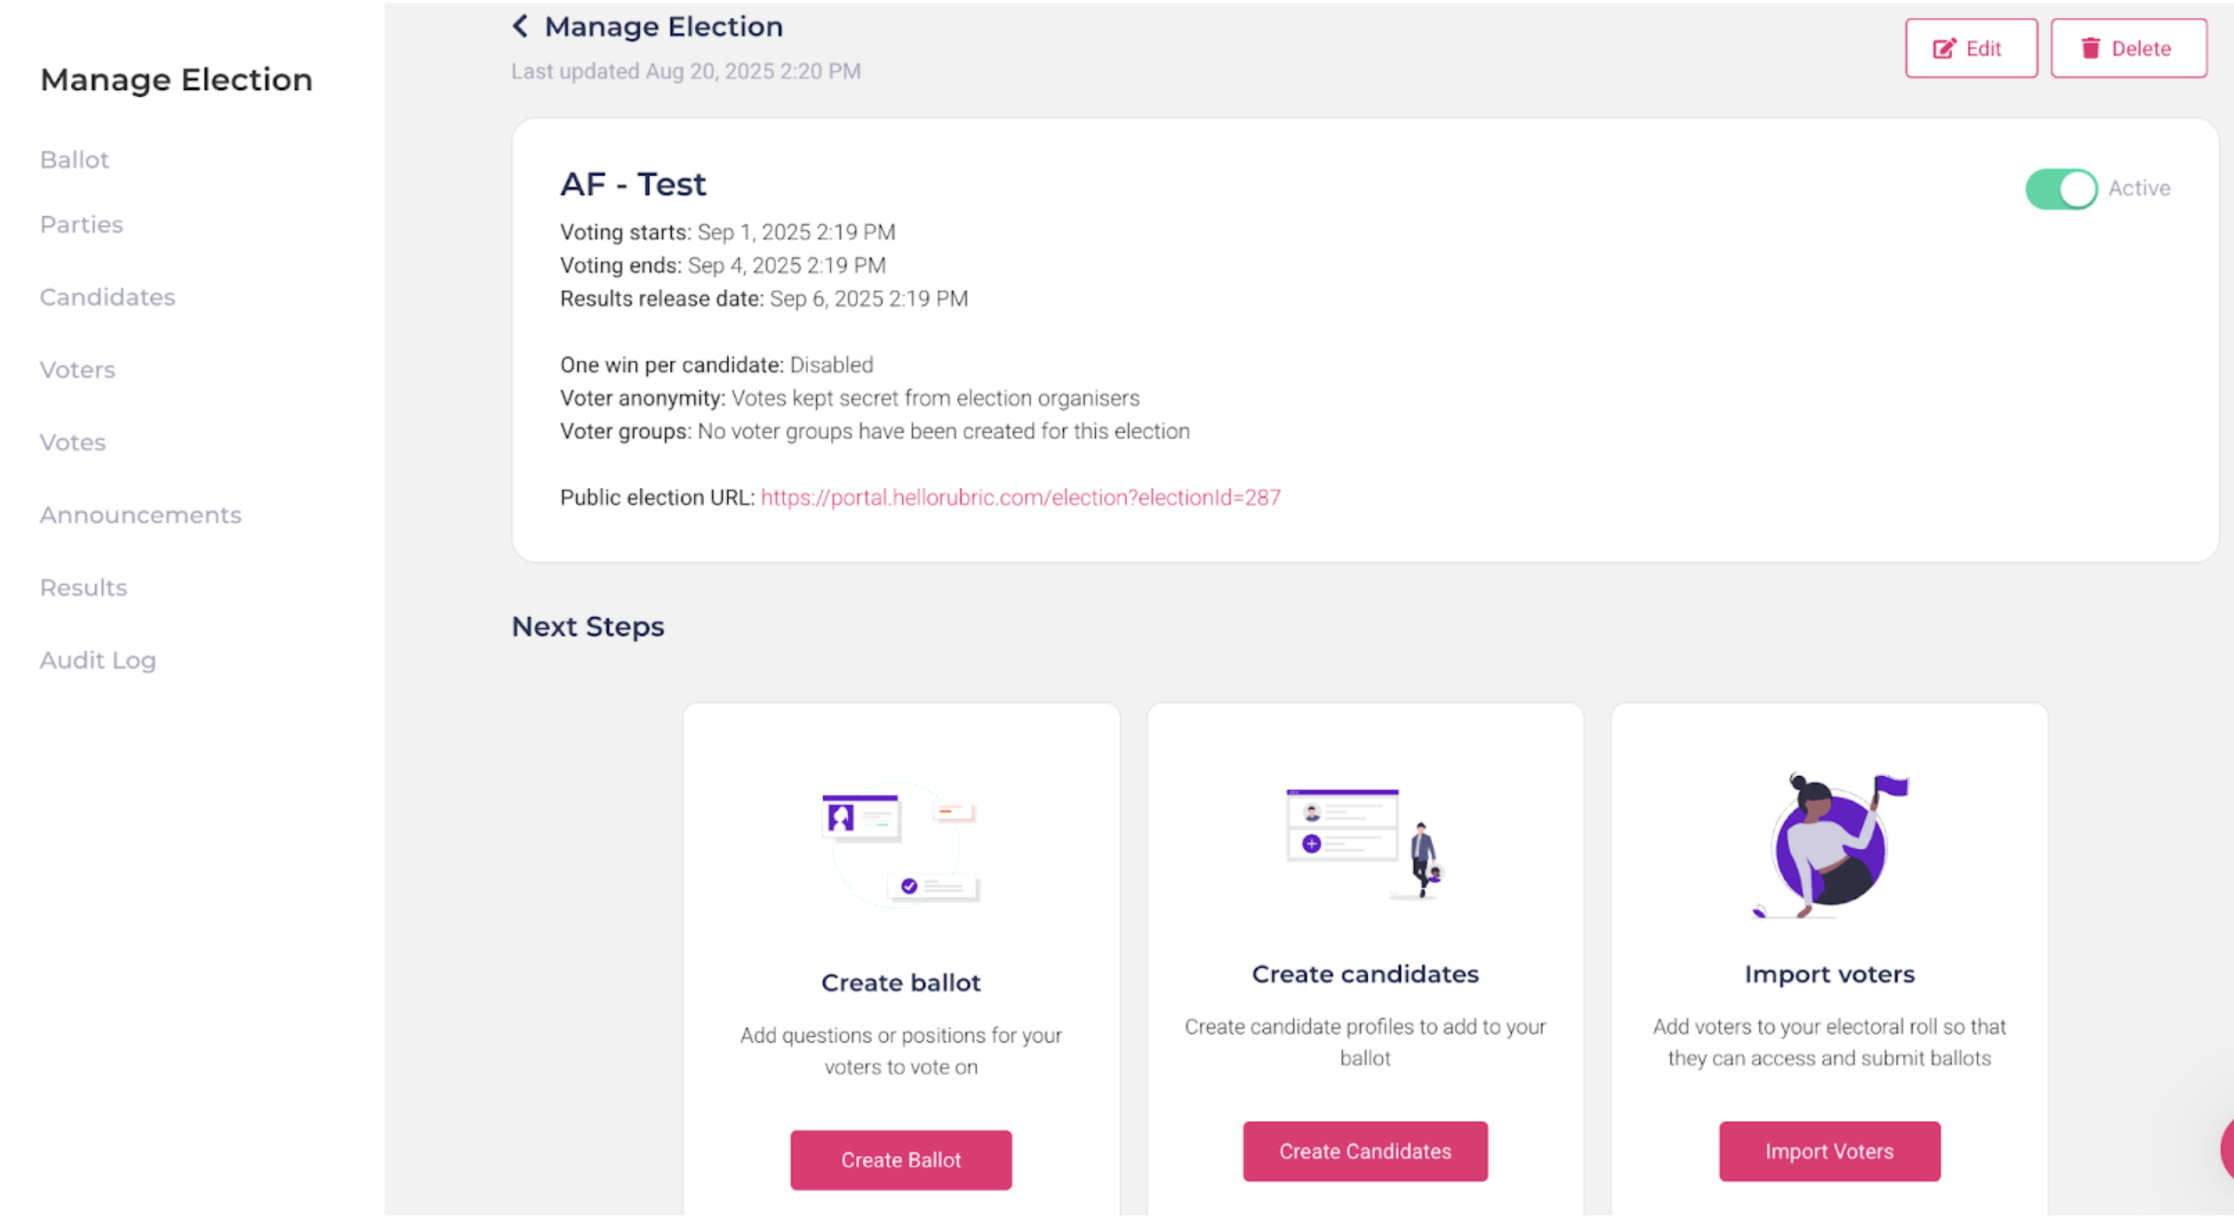
If everything goes well, you should be brought to the Election Management page:
Managing an Election
There are two main features of Elections. The ballot and vote management, and the logistics management. Both of these will need to be fully completed for your elections to run on Rubric. To start off, we’ll review the ballot and vote features at the bottom of the Election Management page.
Creating the Ballot
To create a ballot, start by clicking the “Create Ballot” button in the left-most pop-up at the bottom of the screen. Rubric offers users a drag and drop program that allows them to customize their ballot with simple pre-coded metrics. Making your ballot (aka, elections form) flexible and easily delivered.
The ballot header is a brief introduction to your members, including the title of your election (set in step one) and a description. Things that may be important to include in your election:
-
A brief (1-2 sentences) address. Including a greeting, and emphasis of the importance of the electoral process.
-
A notice of the timeline of the elections. Including when the ballot opens, closes, and results are set to release.
-
A list of how a vote is considered invalid. This could include casting multiple votes, sharing the voting link with non-members, incorrectly stating your full name or registered member email, etc.
-
Note that these must be listed in your constitution or election package (formal documentation which is voted on) to be enforceable.
-
The ballot body is where you get to customize your ballot according to how your members are voting, and what your members are voting for. You would always be voting for your officer positions, unless a rare unforeseen circumstance occurs. To insert these elements, simply click and drag them into the ballot in the centre of the screen, releasing them and ordering them as you prefer.
A full detailed overview of the different drag-and-drop elements your group could utilize can be found from the official Rubric help page. |
The usage of Student Bank Details and Student ID is strictly prohibited under the University of Alberta FOIP policy. Do not use these elements under any circumstances.
Once your ballot is complete, click Preview Ballot to ensure it is ready to be published. After that, don't forget to save the ballot. You'll return back to the Election Management page.
Creating Candidates
To create a candidate, start by clicking the “Manage Candidates" button at the bottom of the Election Management page. The four elements of a given candidate profile are summarized as such:
- Name - Should include first name (preferred) and last name of a candidate.
- Photo - Should be a professional photo for easy identification, screened by your Elections Officer.
- [Optional] Candidate Party - If the candidate is representing one of the parties only available to a select voting demographic (i.e. First Year Representative) ensure they are set as such.
- [Optional] Candidate Description - A brief description of the candidate, such as their experiences within the group, year of study, passion for the organization, etc.
Candidates can also be created when creating the ballot. You can also edit and delete candidates in the manage candidates page - but note that deleting a candidate will remove them from the ballot entirely, which may break your ballot if you try to publish it.
Importing Voters
In order for your election to run, your voters must be able to access the ballot and record their votes. Click on "import voters" on the bottom of the Election Mangement page. There are two ways to give your voters access...
- Import Voters - This is the recommended way. To do so, click on the "Import Voters" button on the top-right of the screen. You will need to import the information using the csv. template provided by Rubric. Import all necessary information, and click "save".
- Add Voters - This is the manual way. Individually import a voter by imputing their name, voter email, and assigning them to the correct voter group.
- Note that if you make them a test voter, you must remove the test voters before the results can be published. That way the final voting tally is representative of legitimate voters.
Election Logistics
Now that we've set up the ballot, candidatescandidates, and voters, we can move on to the election logistics. To start, return to the Election Management page of your election of interest:
On the left-hand side you have the Manage Elections overview. Selecting ballot, candidates, or voters will take you to the same management pages as described above. Below is a brief summary of the other (new) logistical elements:
| Parties |
Allows you to Create Parties (cohorts of individuals, such as a slate or Co-Executives) for the ballot.
|
| Votes |
Once a vote is cast, you can see the full list of voters who completed the ballot.
|
| Announcements |
There are three types of announcements that may be edited and sent out...
You can either edit a pre-existing template linked to the Elections Feature, or edit directly via the Campaign feature. These can also be schedule-sent in advance! |
Once all of this is done, you can then set your election to Active by clicking on the toggle on the top-right side of the Election Management page! |
Announcing Results
Once the voting window has ended, the student group will need to validate and announce the results to their membership.
It is the group's responsibility to ensure all votes are valid, and the group meets Quorum and Majority. Please refer to the terminology page for more information.
- From the Events Management Page, on the left-hand side, click on Results.
- On the top-right side of the Manage Results page, click on Count Votes.
- The program will automatically tally the votes cast, and display the results as statistics (graphs, pie charts).
- This process will analyze each position and determine the results based on the ballot question type and the counting method chosen during the ballot's creation.
- You can then publish the results, making them available to view on the club's page only after the specified results release date set during the ballot's creation.
- Ensure you use a test elections form to see what information becomes publicized. If you do not want the formal percentages (i.e. who won/lost by what percentage of votes cast) this will need to be determined ahead of the results release date.
Appeals & Auditing
In the case when an individual calls for an appeal (a reconsideration of the election procedure and/or election results) it is important to access information that supports the initial investigation. Here are a few key details that Rubric provides groups to ensure elections are run fairly:
Audit Log
Any single individual who accesses the Elections Feature on a group page is recorded in the Audit Log. Including the portal used to gain access, the type of action, the person's email, and a time stamp. Some key disclaimers:
- Administrators (SGS/UASU Staff) can access a group's elections via the adminstrative portal. These individuals are specifically marked as Union users.
- Access is when an individual only opens a page without interacting with any elements. Create or Update is when an individual physically alters the information/permissions of the election itself.
- If you are looking into the audit of a specific individual, you can Filter the table by that individual's email and see their full history on the elections page.
Appeal processes are required to be outlined in a student group's constitution, this should be referenced first in the case of an appeal. If additional support is needed, contact Student Group Services at clubs@uasu.ca.
Common Troubleshooting
With the Elections Feature on Rubric offering so many options, lots of student groups tend to run into roadblocks. Below are a few common issues, and their solutions. In the event that additional support is needed, contact Student Group Services at clubs@uasu.ca.
- Ensure that your election dates (announcement, voting window, results) are at least 24-hours in the future.
- Ensure that the Voters, Ballot, and Candidates field have all been set up. These are the bare minimum requirements for your election to be published.
- Ensure that the group is affiliated. Your club will not appear on the group page and may become inaccessible to voters who use the elections link/recieve communications. To regain affiliation, you will need to complete your group's annual registration.