# Rubric

Rubric is our home for all things student group involvement! Student group executives can complete annual registration, submit events, manage their membership, sell tickets, message their members, and more via Rubric! Check out this chapter of our resource book to help you succeed.

# Frequently Asked Questions About Rubric (draft)

Believe it or not, lots of clubs have the same issue! Student Group Services compiles all of the most frequent problems, creates simple solutions, and lists out step-by-step instructions for future reoccurrences. Check this page to troubleshoot before reaching out to our team!

---

##### **Why can't I find a student group or event on the Rubric search page?**

There are two search queries on Rubric: Events and Societies. First, you will need to ensure the location and University are properly selected (Alberta, Canada and the University of Alberta). To ensure you are on the right database, refer to the top of the filter on the left-side of the screen (red circle). If you want to switch between databases, refer to the navigation bar at the top of the screen (blue rectangle).

If you still cannot find a specific student group or event on the database, this is because the group is not currently affiliated, or the event has not been approved yet. Only affiliated groups and approved events will show up in the public version of the database.

[![Screenshot 2025-07-17 at 9.58.03 AM.png](https://s3.su.ualberta.ca/docs/uploads/images/gallery/2025-07/RLXeQoIBrbWNOONH-screenshot-2025-07-17-at-9-58-03-am.png)](https://s3.su.ualberta.ca/docs/uploads/images/gallery/2025-07/RLXeQoIBrbWNOONH-screenshot-2025-07-17-at-9-58-03-am.png)

##### <span style="color: rgb(34, 34, 34); font-family: -apple-system, 'system-ui', 'Segoe UI', Oxygen, Ubuntu, Roboto, Cantarell, 'Fira Sans', 'Droid Sans', 'Helvetica Neue', sans-serif; font-size: 1.1em;">I missed my group's registration deadline! What happens to our Rubric account?</span>

If a group has not submitted its registration, or a registration is not approved by the group's affiliation deadline, the group will be disaffiliated, AKA frozen. A group that is not affiliated is unable to submit events, receive banking documentation, hold elections, etc. If this has happened to your group, you can be re-affiliated by submitting and receiving approval of its registration.

##### **What does it mean when my group is affiliated or disaffiliated on Rubric?**

Rubric's terminology differs from our old platform - but the concepts are quite similar! Here's a breakdown of some terms you may encounter, and what they mean.

<table border="1" id="bkmrk-old-terminology-new-" style="border-collapse: collapse; width: 100%; height: 318.688px;"><colgroup><col style="width: 16.3169%;"></col><col style="width: 18.6646%;"></col><col style="width: 65.0185%;"></col></colgroup><tbody><tr style="height: 53.7266px;"><td class="align-center" style="height: 53.7266px;">##### BearsDen Term

</td><td class="align-center" style="height: 53.7266px;">##### Rubric Term

</td><td style="height: 53.7266px;">##### Definition

</td></tr><tr style="height: 102.594px;"><td class="align-center" style="height: 102.594px;">Active

</td><td class="align-center" style="height: 102.594px;">Affiliated

</td><td style="height: 102.594px;">The status of groups that has submitted annual registration and met all the requirements of recognition, resulting in the approval of their registration. These groups are able to access all available features on Rubric and all the privileges of student group recognition.

</td></tr><tr style="height: 80.9766px;"><td class="align-center" style="height: 80.9766px;">Frozen

</td><td class="align-center" style="height: 80.9766px;">Disaffiliated

</td><td style="height: 80.9766px;">The status of groups that fail to obtain an approved registration by their affiliation deadline, which is a month following their election month. The group will have little to no access to Rubric's features until they obtain approval of their registration. [You can read more here.](https://docs.su.ualberta.ca/books/student-group-services/page/registration-formsn)

</td></tr><tr style="height: 81.391px;"><td class="align-center" style="height: 81.391px;">Deactivated

</td><td class="align-center" style="height: 81.391px;">Archived

</td><td style="height: 81.391px;">The status of groups that have been disaffiliated for over a year following their affiliation deadline. The group's account will no longer be accessible, and they will not be eligible to reregister. [You can read more here.](https://docs.su.ualberta.ca/books/student-group-services/page/group-reregistration)

</td></tr></tbody></table>

<p class="callout success align-left">**[Learn more about student group recognition and registration here!](https://docs.su.ualberta.ca/books/student-group-services/chapter/student-group-recognition)**</p>

##### **I don't have access to my club's email! How do I get into my club's Rubric account?**

Groups that cannot access their club email inbox will need to have their Rubric account email changed by Student Group Services. The group's President can reach out to <clubs@uasu.ca> to request this change so they can access the account, submit registration, and receive email updates about the status of their submission. Rubric account emails must be switched back to a club email after registration is approved.

Please note that if your group's CCID has expired, you will not be able to renew it until your registration is approved. For more information, [check out this resource page](https://docs.su.ualberta.ca/books/student-group-services/page/student-group-ccid). If your group email is not a group CCID email, Student Group Services cannot help recover the account.

##### **Why am I unable to edit the name of (or delete) certain executive positions on Rubric?**

Rubric has four default positions: President, Secretary, Vice President, and Treasurer. These positions cannot be deleted or have their names edited. These roles can, however, have their permissions altered, and can remain unassigned. Please note that it is mandatory for each student group to have the executive positions of 'President' and 'Treasurer' (or equivalent). If you have no use for the four default positions (i.e. they are titled differently in your constitution) keep them unassigned and they will not show up on your executive roster.

##### **I am a group executive, and I cannot access features on my club management page.**

Only student accounts assigned executives roles with specific permissions can access specific pages. Try troubleshooting these issues:

1. Are you logging into the **student portal,** and switching to the **club management** page?
2. Is your group **affiliated?**
3. Are you assigned as an **executive?**
4. Does your role have the **right positions?**

# Logging in as a Club

Rubric allows users to log in as individuals, or as clubs. If you are a group executive and your user account is connected to your club account, you are able to swap to the club account after logging in as a user. If you are a group executive and your user account is *not* connected to your club account, you will need to log in via [the Rubric Club portal. ](https://portal.hellorubric.com/login?r=)**You should avoid logging in via your club account outside of transferring primary control of the account to another user.**

1. On [hellorubric.com](https://hellorubric.com), click on the "Login" drop-down and select **Clubs Portal,** or go to portal.hellorubric.com.
2. Login with your **club email** and password. 
    - If you do not know your password, but have access to your club email, you can request a password reset.
    - If you do not have access to your club email, reach out to <clubs@uasu.ca> to have the account email changed.
    - If you are prompted to create a club account, you are using the wrong email. Reach out to <clubs@uasu.ca> to confirm the proper email address.

If you successfully log in, you should be on the **club management** page:

[![Screenshot 2025-07-16 at 2.10.28 PM.png](https://s3.su.ualberta.ca/docs/uploads/images/gallery/2025-07/hfo1P6OePCrRgCAM-screenshot-2025-07-16-at-2-10-28-pm.png)](https://s3.su.ualberta.ca/docs/uploads/images/gallery/2025-07/hfo1P6OePCrRgCAM-screenshot-2025-07-16-at-2-10-28-pm.png)

If you are setting up your executive access to your group's account, the next step is to grant yourself permission as the **primary officer** (President or equivalent) of the student group.

1. Click on the icon in the upper right-hand corner of the clubs homepage.
2. Click "Society Exec Team".
3. Scroll down to the bottom table, and click "Add club executive".
4. Input all information using your **UAlberta email**, and set yourself as President. 
    - As a precaution, double-check that the President role has **all permissions** using the top table.

Finally, you should ensure you have access by logging in to your student account.

1. Navigate to the [hellorubric.com](https://hellorubric.com) page.
2. Click the "Login" drop-down and select **Student** **Portal**.
3. Login with your **UAlberta email** and password.
4. Click the icon in the upper right-hand corner.  
    
    - You will now be able to view your club page as a **club executive** by clicking on the account profile.

You have now successfully set up your student account as the primary officer! You can also add other executives to the team to link their accounts to the club account. **Do not share the club account password with anyone on your team who should not have full access to your club's page and features.**

# Logging in as an Executive

Rubric allows users to log in as individuals, or as clubs. If you are a group executive and your user account is connected to your club account, you are able to swap to the club account after logging in as a user. If you are a group executive and your user account is *not* connected to your club account, your group's president must assign you an executive role. [They can do so by following the steps on this page.](https://docs.su.ualberta.ca/books/student-group-services/page/executive-team)

Once you are assigned an executive role, you can log into your user account and switch to the club account.

1. Navigate to the [hellorubric.com](https://hellorubric.com) page.
2. Click the "Login" drop-down and select **Student** **Portal**.
3. Login with your **UAlberta email** and password.
4. Click the icon in the upper right-hand corner.  
    
    - You will now be able to view your club page as a **club executive** by clicking on the account profile.

If you successfully log in, you should be on the **club management** page:

[![Screenshot 2025-07-16 at 2.10.28 PM.png](https://s3.su.ualberta.ca/docs/uploads/images/gallery/2025-07/hfo1P6OePCrRgCAM-screenshot-2025-07-16-at-2-10-28-pm.png)](https://s3.su.ualberta.ca/docs/uploads/images/gallery/2025-07/hfo1P6OePCrRgCAM-screenshot-2025-07-16-at-2-10-28-pm.png)

# Club Homepage & Settings

### <span style="color: rgb(20, 156, 235);">The Club Homepage</span>

<span style="color: rgb(0, 0, 0);">Every student group on Rubric has its own **homepage**, which is linked to the club's **account email**. This homepage can be found on the Students' Union's Rubric, and is how students interested in a club interact with the organization.  
  
In order to access this homepage, log in via your user account and switch to your **executive account**. If you are not set up as a club executive, [refer to this page.](https://docs.su.ualberta.ca/books/student-group-services/page/executive-team)</span>

1. On [hellorubric.com](https://hellorubric.com), click on the "Login" drop-down and select **Students Portal.**
2. Login with your **UAlberta email** and password.
3. Click on the icon in the top-right of the screen
4. Click on the name of your club.
5. Using the **top navigation bar** on the club management page, click on **Link in Bio**.

If done correctly, your page should look like something like this:

<span style="color: rgb(0, 0, 0);">[![Screenshot 2025-07-24 at 12.18.43 PM.png](https://s3.su.ualberta.ca/docs/uploads/images/gallery/2025-07/VkC8ve1JmYIioZBI-screenshot-2025-07-24-at-12-18-43-pm.png)](https://s3.su.ualberta.ca/docs/uploads/images/gallery/2025-07/VkC8ve1JmYIioZBI-screenshot-2025-07-24-at-12-18-43-pm.png)</span>

You will always be able to tell if you are viewing your homepage as an executive if you can see the **club link** in the middle of the header, along with the ability to manually edit sections. The following sections can be edited:

- **Memberships**: Any membership types created and set to **active** are visible on your club page. This is how students can voluntary sign-up for your organization.
- **News:** You can post brief updates to your club homepage for people to read. It can include text, links to external websites, and a header - they appear (descending) from **newest to oldest.**
- **Events:** Any approved events will appear in your events tab. Upcoming events that are still taking sign-ups are available, but it also lists past events.
- **Merchandise**: *This feature is currently disabled by our Union.*
- **Committee**: Any member assigned an **executive role** on Rubric is displayed here. You can edit their profile picture, biography, or remove them from the public listing.
- **Deals**: If you have any deals for event tickets or membership prices, they appear here for students to purchase.

### <span style="color: rgb(20, 156, 235);">Editing Link in Bio</span>

<span style="color: rgb(20, 156, 235);"><span style="color: rgb(0, 0, 0);">Anything you want to edit can be done using the edit button (pencil icon) under each section tab outlined in the previous section. There are three other sections of your group's homepage that are open to customization:</span></span>

1. **<span style="color: rgb(20, 156, 235);"><span style="color: rgb(0, 0, 0);">Profile Picture:</span></span>**<span style="color: rgb(20, 156, 235);"><span style="color: rgb(0, 0, 0);"> Using the edit button on the left-side of the screen, you can upload a **PNG file** for your group's profile picture. This is displayed on the homepage, events, membership passes, and so forth.</span></span>
2. **<span style="color: rgb(20, 156, 235);"><span style="color: rgb(0, 0, 0);">Homepage Header:</span></span>**<span style="color: rgb(20, 156, 235);"><span style="color: rgb(0, 0, 0);"> Using the edit button on the top of the screen, you can upload a **PNG file** for your group's banner. This is displayed as the backdrop for your group's homepage.</span></span>
3. <span style="color: rgb(20, 156, 235);"><span style="color: rgb(0, 0, 0);">**Homepage Bio**: Underneath your group's formal title on the left side of the screen, there is an edit button. Here you can change the brief description of your club, along with linking different social medias (instagram, discord, external website, etc).</span></span>
4. **<span style="color: rgb(20, 156, 235);"><span style="color: rgb(0, 0, 0);">Email:</span></span>**<span style="color: rgb(20, 156, 235);"><span style="color: rgb(0, 0, 0);"> At the bottom left-side, there is an envelope icon. Students can click this to get in contact with the **club account email**. Ensure this is set properly in your **Society Settings**.</span></span>

<span style="color: rgb(20, 156, 235);"><span style="color: rgb(0, 0, 0);">After all of your edits are complete, you can click the **View Live Page** button. This will allow you to switch to a student-facing view of your homepage!</span></span>

### <span style="color: rgb(20, 156, 235);">Society Settings</span>

<span style="color: rgb(20, 156, 235);"><span style="color: rgb(0, 0, 0);">For those with access to the **club account email**, or executives with **society setting** permissions (we strongly suggest only the *President* have this permission) they are able to access the group's foundational features. In order to access the settings, log in via your user account and switch to your **executive account**. If you are not set up as a club executive, [refer to this page.](https://docs.su.ualberta.ca/books/student-group-services/page/executive-team)  
</span></span>

1. On [hellorubric.com](https://hellorubric.com), click on the "Login" drop-down and select **Students Portal.**
2. Login with your **UAlberta email** and password.
3. Click on the icon in the top-right of the screen
4. Click on the name of your club.
5. On the **club management** page, click on the black icon in the top-right of the screen.
6. Click on "Settings"

If done correctly, you should be able to see a page similar to this:

[![Screenshot 2025-07-24 at 1.44.34 PM.png](https://s3.su.ualberta.ca/docs/uploads/images/gallery/2025-07/ekHDlq1oaMKSt0CU-screenshot-2025-07-24-at-1-44-34-pm.png)](https://s3.su.ualberta.ca/docs/uploads/images/gallery/2025-07/ekHDlq1oaMKSt0CU-screenshot-2025-07-24-at-1-44-34-pm.png)

There are two side-tabs on the left side of the club settings page: **Settings**, and **Exec Team Management**. More information about the latter can be [found on this page.](https://docs.su.ualberta.ca/books/student-group-services/page/executive-team)

For the club **Settings**, there are three sections: the **General Settings**, the **Subscription Settings,** and the **Bank Account** settings.

##### General Settings

Basic features of your group can be edited and sorted on this part of the page. If a section is greyed out, you will need to submit an [information change request form](https://portal.hellorubric.com/form?fid=5106) via Rubric.

- **Full Name** - The full name of the group.
- **Acronym** - The shorthand name of the group.
- **Discord URL** - You can upload a link to a discord server where your group is hosted.
- **Category** - The main category for your group. This is how students might filter clubs when searching for their interests.
- **Contact Email** - This is the email address that you will use to log into your club account, and communications related to your club's submissions will go to this email by default. Please ensure this is an email address that you have reliable access to, and is not an individual student's email.
- **Business Number** - Groups that are recognized businesses in Canada are assigned a unique 9-digit identifier number. This section will be left blank.
- **Mailing Address - The address for where mail will be sent for the group. This can be left blank, or you can use the [Student Life Central address](https://docs.su.ualberta.ca/books/student-group-services/page/mailing-address).
- **Facebook Page** - You can upload a link to a FaceBook page that represents your group.
- <span style="color: rgb(224, 62, 45);">**Account Password** - The login password for the club account. Do not share/change this unless you are the group's President!</span>
- **<span style="color: rgb(224, 62, 45);">University -</span>**<span style="color: rgb(224, 62, 45);"> To *always* be set to the University of Alberta. **DO NOT ALTER THIS** or you will be locked out of your student account, and Student Group Services is unable to access it for you. </span>
- <span style="color: rgb(0, 0, 0);">**Colour Hex** - This feature has yet to be implemented on the platform.</span>
- **<span style="color: rgb(0, 0, 0);">Society Logo</span>**<span style="color: rgb(0, 0, 0);"> - The logo of your group page, which will show up on all elements of your club (events, homepage, membership passes). [Please ensure your logo is in compliance with trademark requirements.](https://docs.su.ualberta.ca/books/student-group-services/page/licensing-and-trademarks)</span>

<p class="callout info">[<span style="color: #000000;">Use the Information Change Request Form to update your group name, acronym, bank account settings, and more!</span>](https://portal.hellorubric.com/form?fid=5106)</p>

##### Subscription Settings

Rubric automates messages (emails &amp; SMS) to all clubs and users on their platform. Though we strongly recommend keeping these features on, groups have the right to toggle specific subscriptions at their discretion. Simply uncheck one of the messaging services, and you will stop receiving communications.

##### Bank Account Settings

For groups that wish to use Rubric for **monetary transactions**, you will need to input your banking information. Once your bank account information is set, payments will be sent to that account from **ticket, membership, or deal sales**.

Note that, this will not give Rubric unrestricted access to your bank account. Rather, it will work like other transaction platforms (e.g. Paypal) as a means of transferring money from one digital wallet to another.

The **settlement** is the schedule for when these revenues will be sent to your account; a.k.a. the **payout**.

- **Weekly:** Receive sales proceeds every 7-14 days
- **Monthly:** Get funds deposited monthly
- **Post Event:** Receive funds following your event, typically within 1-2 weeks.

For membership and merchandise sales, payments are sent to your account **weekly**.

If you have more questions regarding how the payment system works on Rubric, please reach out to their support team at <support@hellorubric.com>.

# Running Elections (draft)

## <span style="color: rgb(20, 156, 235);">Elections Overview</span>

It is in a group's **best interest** that elections be fully managed on Rubric, for situations when results must be reviewed and verified. The platform has a variety of settings to ensure that voters can democratically engage with their clubs, and that individuals overseeing the elections can abide by processes outlined in a group's constitution.

For a deeper understanding of **democratic procedures** and how to abide by student group policies when conducting an election/byelection, <span style="color: rgb(35, 111, 161);">**[refer to these resources.](https://docs.su.ualberta.ca/books/student-group-services/page/constitution-resources)**</span>

### <span style="color: rgb(20, 156, 235);">Creating an Election</span>

1. Login to your student account via [hellorubric.com](http://hellorubric.com)
    
    
    - Click the “Login” drop-down and select Student Portal. Login with your student email and appropriate password.
    - Note that, you must be assigned an **<span style="color: rgb(132, 63, 161);">[executive role with election permissions](https://docs.su.ualberta.ca/books/student-group-services/page/executive-team) </span>**<span style="color: rgb(0, 0, 0);">(campaign feature &amp; membership)</span> on Rubric to be able to complete this task.
2. On the top navigation bar, click on Elections. You will be taken to the **Elections Manager Overview** page.
    
    
    - To see *past* elections and data, scroll down to the table at the bottom of the page.
    - To create a *new* election, click on the **“Create Election”** button on the top-right of the screen.
        
        
        - It will appear in the Active Elections table at the top of this page for future edits once launched.
3. Input the **basic** Election Information to create your election.
    
    
    - This includes the name of the election. We recommend the following:
        
        
        - *\[Club Name\]: \[Election Type\] - Semester, Year*
            
            
            - Election types are typically annual or byelection.
            - For example, **Lettuce Club: Annual Elections - Fall 2025**
    - The time window for voting. Including the start and end dates.
    - The results release date.
4. For advanced options, there are two additional settings. We highly recommend **both** be set to **true**, by clicking on the icons until they are checkmarked.
    
    <table border="1" style="border-collapse: collapse; width: 100%;"><colgroup><col style="width: 25.0001%;"></col><col style="width: 75.1341%;"></col></colgroup><tbody><tr><td>**One Win Per Candidate**</td><td>Regardless of the format of your ballot, one win per candidate ensures that one person cannot win the majority for more than one position. </td></tr><tr><td>**Anonymous Votes**</td><td>When a vote is casted, no person (administrative or otherwise) can view the information of the voter. Once turned on, this feature cannot be undone.</td></tr></tbody></table>
5. Proceed to the (optional) voter group settings. This will allow you to create cohorts of voters that can then be assigned certain votes limited to their group. Some examples are as follows:
    
    
    - - A delegate representing an off-branching student group represented on your council should only be voted on by members of that branching organization.
        - A first year representative vote should only be available to members in the First Year voter group.

**If everything goes well, you should be brought to the Election Management page:**

**[![Screenshot 2025-10-14 at 11.15.48 AM.png](https://s3.su.ualberta.ca/docs/uploads/images/gallery/2025-10/EvfBBkL2CExCHjYH-screenshot-2025-10-14-at-11-15-48-am.png)](https://s3.su.ualberta.ca/docs/uploads/images/gallery/2025-10/EvfBBkL2CExCHjYH-screenshot-2025-10-14-at-11-15-48-am.png)**
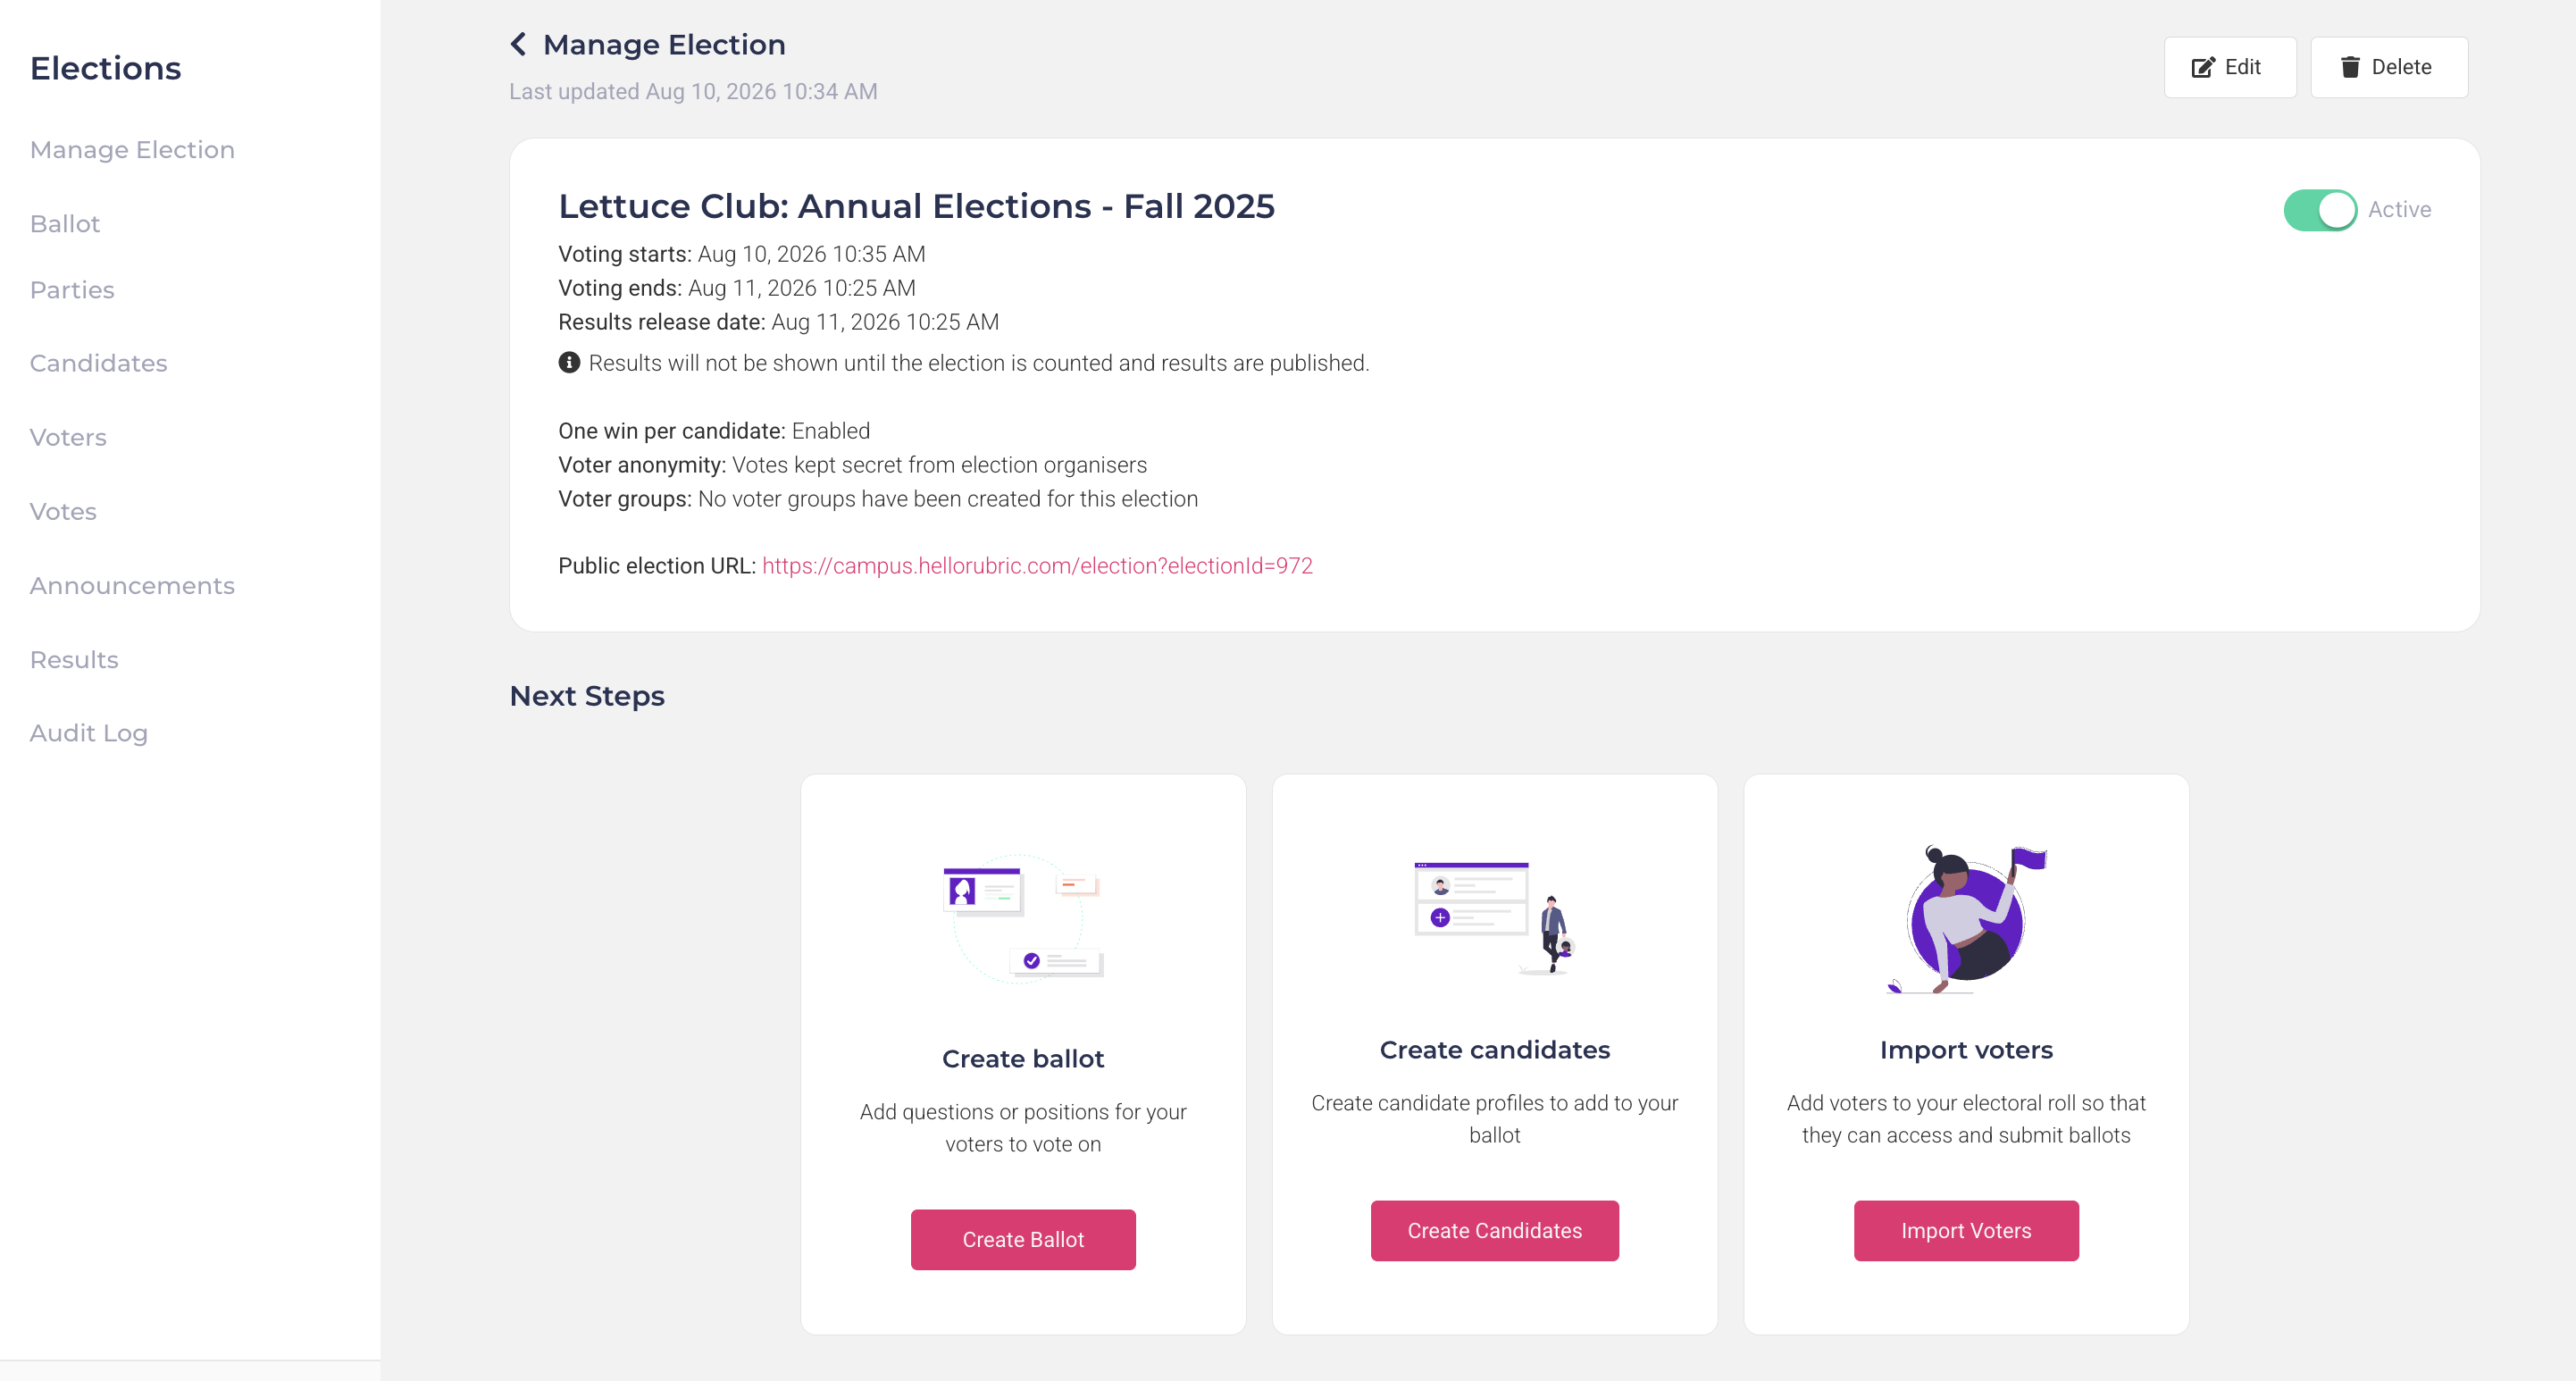
### <span style="color: rgb(20, 156, 235);">Managing an Election</span>

<span style="color: rgb(0, 0, 0);">There are **two** main features of Elections. The **ballot and vote** management, and the logistics management. Both of these will need to be **fully completed** for your elections to run on Rubric. To start off, we’ll review the ballot and vote features at the bottom of the **Election Management** page.</span>

---

#### Creating the Ballot

To create a ballot, start by clicking the “Create Ballot” button in the left-most pop-up at the bottom of the screen. Rubric offers users a drag and drop program that allows them to customize their ballot with simple pre-coded metrics. Making your ballot (aka, elections form) flexible and easily delivered.

The **ballot header** is a brief introduction to your members, including the title of your election (set in step one) and a description. Things that may be important to include in your election:

- A brief (1-2 sentences) address. Including a greeting, and emphasis of the importance of the electoral process.
- A notice of the timeline of the elections. Including when the ballot opens, closes, and results are set to release.
- A list of how a vote is considered invalid. This could include casting multiple votes, sharing the voting link with non-members, incorrectly stating your full name or registered member email, etc.
    
    
    - Note that these must be listed in your constitution or election package (formal documentation which is voted on) to be enforceable.

The **ballot body** is where you get to customize your ballot according to how your members are voting, and what your members are voting for. You would always be voting for your officer positions, unless a rare unforeseen circumstance occurs. To insert these elements, simply **click** and **drag** them into the ballot in the centre of the screen, releasing them and ordering them as you prefer.

<table border="1" id="bkmrk-a-full-detailed-over" style="border-collapse: collapse; width: 100%;"><colgroup><col style="width: 99.8765%;"></col></colgroup><tbody><tr><td>##### A full detailed overview of the different drag-and-drop elements your group could utilize can be found from the **[official Rubric help page.](https://helpcenter.hellorubric.com/collections/2318418-elections)**

</td></tr></tbody></table>

<p class="callout danger">The usage of Student Bank Details and Student ID is strictly **prohibited** under the University of Alberta **[FOIP](https://www.ualberta.ca/en/information-privacy-records-management/foip/index.html)** policy. Do not use these elements under any circumstances.</p>

Once your ballot is complete, click **Preview Ballot** to ensure it is ready to be published. After that, don't forget to **save** the ballot. You'll return back to the **Election Management** page.

#### Creating Candidates

To create a candidate, start by clicking the “Manage Candidates" button at the bottom of the **Election Management** page. The four elements of a given candidate profile are summarized as such:

- **Name -** Should include first name (preferred) and last name of a candidate.
- **Photo -** Should be a professional photo for easy identification, screened by your Elections Officer.
- **\[Optional\] Candidate Party -** If the candidate is representing one of the parties only available to a select voting demographic (i.e. First Year Representative) ensure they are set as such.
- **\[Optional\] Candidate Description -** A brief description of the candidate, such as their experiences within the group, year of study, passion for the organization, etc.

Candidates can also be created when **creating the ballot.** You can also edit and delete candidates in the manage candidates page - but note that *deleting a candidate* will remove them from the ballot entirely, which may **break your ballot** if you try to publish it.

#### Importing Voters

In order for your election to run, your voters must be able to access the ballot and record their votes. Click on "import voters" on the bottom of the **Election Mangement page.** There are **two ways** to give your voters access...

1. **Import Voters** - This is the *recommended* way. To do so, click on the "Import Voters" button on the top-right of the screen. You will need to import the information using the **csv.** template provided by Rubric. Import all necessary information, and click "save".
2. **Add Voters** - This is the *manual* way. Individually import a voter by imputing their name, voter email, and assigning them to the correct voter group. 
    - Note that if you make them a **test voter,** you must **remove the test voters** before the results can be published. That way the final voting tally is representative of legitimate voters.

### <span style="color: rgb(20, 156, 235);">Election Logistics</span>

<span style="color: #000000;">Now that we've set up the ballot, candidates, and voters, we can move on to the **election logistics**. To start, return to the **Election Management** page of your election of interest:</span>

<span style="color: #000000;">[![Screenshot 2025-10-14 at 11.15.48 AM.png](https://s3.su.ualberta.ca/docs/uploads/images/gallery/2025-10/EvfBBkL2CExCHjYH-screenshot-2025-10-14-at-11-15-48-am.png)](https://s3.su.ualberta.ca/docs/uploads/images/gallery/2025-10/EvfBBkL2CExCHjYH-screenshot-2025-10-14-at-11-15-48-am.png) </span>

On the left-hand side you have the **Manage Elections** overview. Selecting ballot, candidates, or voters will take you to the same management pages as described above. Below is a brief summary of the other (new) logistical elements:

<table border="1" id="bkmrk-recipients-event-att" style="width: 100%; height: 389.297px;"><tbody><tr style="height: 92.4375px;"><td style="width: 17.1817%; height: 92.4375px;">**Parties**</td><td style="width: 82.8183%; height: 92.4375px;">Allows you to **Create Parties** (cohorts of individuals, such as a slate or Co-Executives) for the ballot.

- It will require a name, description, and logo for the group.
- You can then assign individual **candidates** to a party that will appear on the ballot.

</td></tr><tr style="height: 75.6406px;"><td style="width: 17.1817%; height: 75.6406px;">**Votes**</td><td style="width: 82.8183%; height: 75.6406px;">Once a vote is cast, you can see the **full list** of voters who completed the ballot.

- You can also **export** the list if you'd like to store the data in a secondary location.

</td></tr><tr style="height: 221.219px;"><td style="width: 17.1817%; height: 221.219px;">**Announcements**</td><td style="width: 82.8183%; height: 221.219px;">There are **three** types of announcements that may be edited and sent out...

1. **Announce Election**: Once your election is *Pending* you may send out an announcement to a specific list of voters, emails, and/or membership tier on Rubric.
2. **Send Voting Email**: Once your election is *Active* you may send out a **secure link** for voters to use to cast a vote in the ballot. Ensure you remind everyone not to share this link with other individuals.
3. **Send Results to Voters**: Once your election is *Closed* you may announce the results via a summary generated by the Rubric platform.

You can either edit a pre-existing template linked to the *Elections* Feature, or edit directly via the *Campaign* feature. These can also be schedule-sent in advance!

</td></tr></tbody></table>

<table border="1" id="bkmrk-once-all-of-this-is-" style="border-collapse: collapse; width: 100%;"><colgroup><col style="width: 99.8765%;"></col></colgroup><tbody><tr><td>##### Once all of this is done, you can then set your election to *Active* by clicking on the toggle on the top-right side of the Election Management page!

</td></tr></tbody></table>

### <span style="color: rgb(20, 156, 235);">Announcing Results</span>

<span style="color: #000000;">Once the voting window has ended, the student group will need to **validate and announce** the results to their membership. </span>

<p class="callout warning"><span style="color: #000000;">It is the group's responsibility to ensure all votes are valid, and the group meets Quorum and Majority. Please refer to **<span style="color: rgb(230, 126, 35);">[the terminology page for more information.](https://docs.su.ualberta.ca/books/student-group-services/page/terminology)</span>**</span></p>

1. <span style="color: #000000;">From the **Events Management Page**, on the left-hand side, click on *Results*.</span>
2. <span style="color: #000000;">On the top-right side of the Manage Results page, click on *Count Votes*.</span>
    - <span style="color: #000000;">The program will automatically tally the votes cast, and display the results as statistics (graphs, pie charts).</span>
    - <span style="color: #000000;">This process will analyze each position and determine the results based on the ballot question type and the counting method chosen during the ballot's creation.</span>
3. <span style="color: #000000;">You can then **publish** the results, making them available to view on the club's page only **after** the specified results release date set during the ballot's creation.</span>
    - Ensure you use a **test elections form** to see what information becomes publicized. If you do not want the formal percentages (i.e. who won/lost by what percentage of votes cast) this will need to be determined ahead of the results release date.

### <span style="color: #149ceb;">Appeals &amp; Auditing</span>

<span style="color: #149ceb;"><span style="color: #000000;">In the case when an individual calls for an appeal (a reconsideration of the election procedure and/or election results) it is important to access information that supports the initial investigation. Here are a few key details that Rubric provides groups to ensure elections are run fairly:  
</span></span>

#### Audit Log

Any single individual who accesses the *Elections* Feature on a group page is recorded in the Audit Log. Including the portal used to gain access, the type of action, the person's email, and a time stamp. Some key disclaimers:

- **Administrators** (SGS/UASU Staff) can access a group's elections via the adminstrative portal. These individuals are specifically marked as *Union* users.
- **Access** is when an individual only opens a page without interacting with any elements. **Create** or **Update** is when an individual physically alters the information/permissions of the election itself.
- If you are looking into the audit of a specific individual, you can **Filter** the table by that individual's email and see their full history on the elections page.

Appeal processes are required to be outlined in a student group's constitution, this should be referenced first in the case of an appeal. If additional support is needed, contact Student Group Services at [clubs@uasu.ca.](mailto:clubs@uasu.ca)

### <span style="color: #149ceb;">Common Troubleshooting</span>

<span style="color: #149ceb;"><span style="color: #000000;">With the *Elections* Feature on Rubric offering so many options, lots of student groups tend to run into roadblocks. Below are a few common issues, and their solutions. In the event that additional support is needed, contact Student Group Services at <clubs@uasu.ca>[.](mailto:clubs@uasu.ca)</span></span>

1. <span style="color: #149ceb;"><span style="color: #000000;">Ensure that your election dates (announcement, voting window, results) are **at least 24-hours in the future**.</span></span>
2. <span style="color: #149ceb;"><span style="color: #000000;">Ensure that the Voters, Ballot, and Candidates field have all been **set up**. These are the bare minimum requirements for your election to be published.</span></span>
3. <span style="color: #149ceb;"><span style="color: #000000;">Ensure that the group is **affiliated**. Your club will not appear on the group page and may become inaccessible to voters who use the elections link/recieve communications. To regain affiliation, you will need to complete your group's annual registration.</span></span>

# Executive Team

### <span style="color: rgb(20, 156, 235);">Updating Your Executive Team</span>

On Rubric, executive management is only available through two paths. The **club account**, or an individual with an executive role that has **society setting** permissions.

If you have not been set as an executive with society settings permissions, or this is your first time accessing the group page, you will need to use the [**club account**](https://docs.su.ualberta.ca/books/student-group-services/page/logging-in-as-a-club). If you **have** been set as an executive with society settings permissions, you can switch to the club account via your student account and edit the executive team.

You will first need to login to your account on [hellorubric.com](https://hellorubric.com/).

- If you are logging in with the club account - use the **Club Portal** from the Login drop-down.
- If you are logging in as a user - use the **Student Portal** from the Login drop-down. 
    - From there, click on your icon in the top-right corner, and switch to the club management page.

Then, navigate to the executive setting page.

1. Click on the black icon in the top-right corner of the screen.
2. Select "Society Exec" from the drop-down list.

There are two tables in this section. The top table is for creating or editing pre-existing **roles**.

1. Click "Create New Role" for new positions.  
    
    - Fill in the fields - the **name** of the position (per your constitution) and the **permissions** of the role.
    - Any given role can be assigned to **multiple** people (i.e. two Co-Presidents can both be given the same permissions, using one President role).
2. You can also edit the current positions. 
    - Click on the three dots located to the right side of a position, and click "Edit" position. 
        - The one roles that **cannot** be deleted, or have their name changed, are the default ones set by Rubric - President, Treasurer, Secretary, and Vice President.

The bottom table is for **assigning** executive roles to your members.

1. Click "Add club executive" to assign a new role to a member. 
    - This field requires their name, **UAlberta** email, and the role assigned - **do not add their student ID number**.
2. Click the three dots next to a listed member to change their assigned role, or remove them from the executive list.

These individuals can now access the **club management page** by logging into their student accounts and switching the page view. The **level of access** a given executive is permitted is based on their **permission setting**.

### <span style="color: rgb(20, 156, 235);">Executive Role Permissions</span>

<span style="color: rgb(68, 68, 68);">Below you will find a comprehensive breakdown of what permissions, when assigned to an executive role on Rubric, give what level of access to your organization's page.</span>

<table border="1" id="bkmrk-communications-commu" style="width: 100%; height: 583.766px;"><colgroup><col style="width: 20.5202%;"></col><col style="width: 79.4798%;"></col></colgroup><tbody><tr style="height: 80.1953px;"><td style="height: 80.1953px;">**COMMUNICATIONS**

</td><td style="height: 80.1953px;">Communications gives access to messaging features on Rubric (**SMS/Email** in the top navigation bar). This includes sending out mass messaging to members, and tracking the engagement of your audience.

</td></tr><tr style="height: 102.594px;"><td style="height: 102.594px;">**MEMBERSHIPS**

</td><td style="height: 102.594px;">Memberships gives access to managing who joins your group, and their information (**Memberships** in the top navigation bar). This includes tracking retention, creating and editing membership types, importing/exporting rosters, ending memberships, and seeing individual member information.

</td></tr><tr style="height: 80.1953px;"><td style="height: 80.1953px;">**SOCIETY SETTINGS\***

</td><td style="height: 80.1953px;">Society Settings gives access to the administrative features of your group (**Society Settings** from the top-right icon). This includes editing the executive team, executive permissions, the club's primary email, the icon of your club, and the bank account details.

</td></tr><tr style="height: 102.594px;"><td style="height: 102.594px;">**UNION FORMS**

</td><td style="height: 102.594px;">Union Forms gives access to all forms involving the Student's Union (**Forms** in the top navigation bar). This includes registration submissions, verification letter requests, newsletter submissions, event submissions, and club information requests. You can also view all past submissions to any union forms.

</td></tr><tr style="height: 80.1953px;"><td style="height: 80.1953px;">**EVENTS**

</td><td style="height: 80.1953px;">Events gives access to the event details of your club (**Events** in the top navigation bar). This includes recently hosted event details, selling tickets, rejected event details, revenue and spending, attendance, and more.

</td></tr><tr style="height: 35.3984px;"><td style="height: 35.3984px;">**MERCHANDISE**

</td><td style="height: 35.3984px;">*This feature has yet to launch on our Union's Rubric.*</td></tr><tr style="height: 102.594px;"><td style="height: 102.594px;">**SETTLEMENTS**

</td><td style="height: 102.594px;">Settlements gives access to the organization's financial information (**Funding** in the top navigation bar). This includes all payments, pending payments, or reimbursements made to the club using Rubric. Note that this feature can only be used when **bank information** is inputted to the society settings.

</td></tr></tbody></table>

\**We* ***strongly*** *recommend that the* *society settings only be given to the President (or equivalent) for the organization's security purposes.*

# Membership

### <span style="color: rgb(20, 156, 235);">Membership Overview</span>

Rubric gives organizations the opportunity to manage multiple **tiers** of membership with different requirements, and registering processes. This page will teach you how to navigate membership features.

To access the **membership** information of your student group, log in via your user account and switch to your **executive account**. If you are not set up as a club executive, [refer to this page.](https://docs.su.ualberta.ca/books/student-group-services/page/executive-team)

1. On [hellorubric.com](https://hellorubric.com/), click on the "Login" drop-down and select **Students Portal.**
2. Login with your **UAlberta email** and password.
3. Click on the icon in the top-right of the screen
4. Click on the name of your club.
5. Using the **top navigation bar** on the club management page, click on **Memberships**.

If done correctly, the page will look like this:

[![Screenshot 2025-07-23 at 2.34.53 PM.png](https://s3.su.ualberta.ca/docs/uploads/images/gallery/2025-07/ffDVvLwSdsLXIpRp-screenshot-2025-07-23-at-2-34-53-pm.png)](https://s3.su.ualberta.ca/docs/uploads/images/gallery/2025-07/ffDVvLwSdsLXIpRp-screenshot-2025-07-23-at-2-34-53-pm.png)
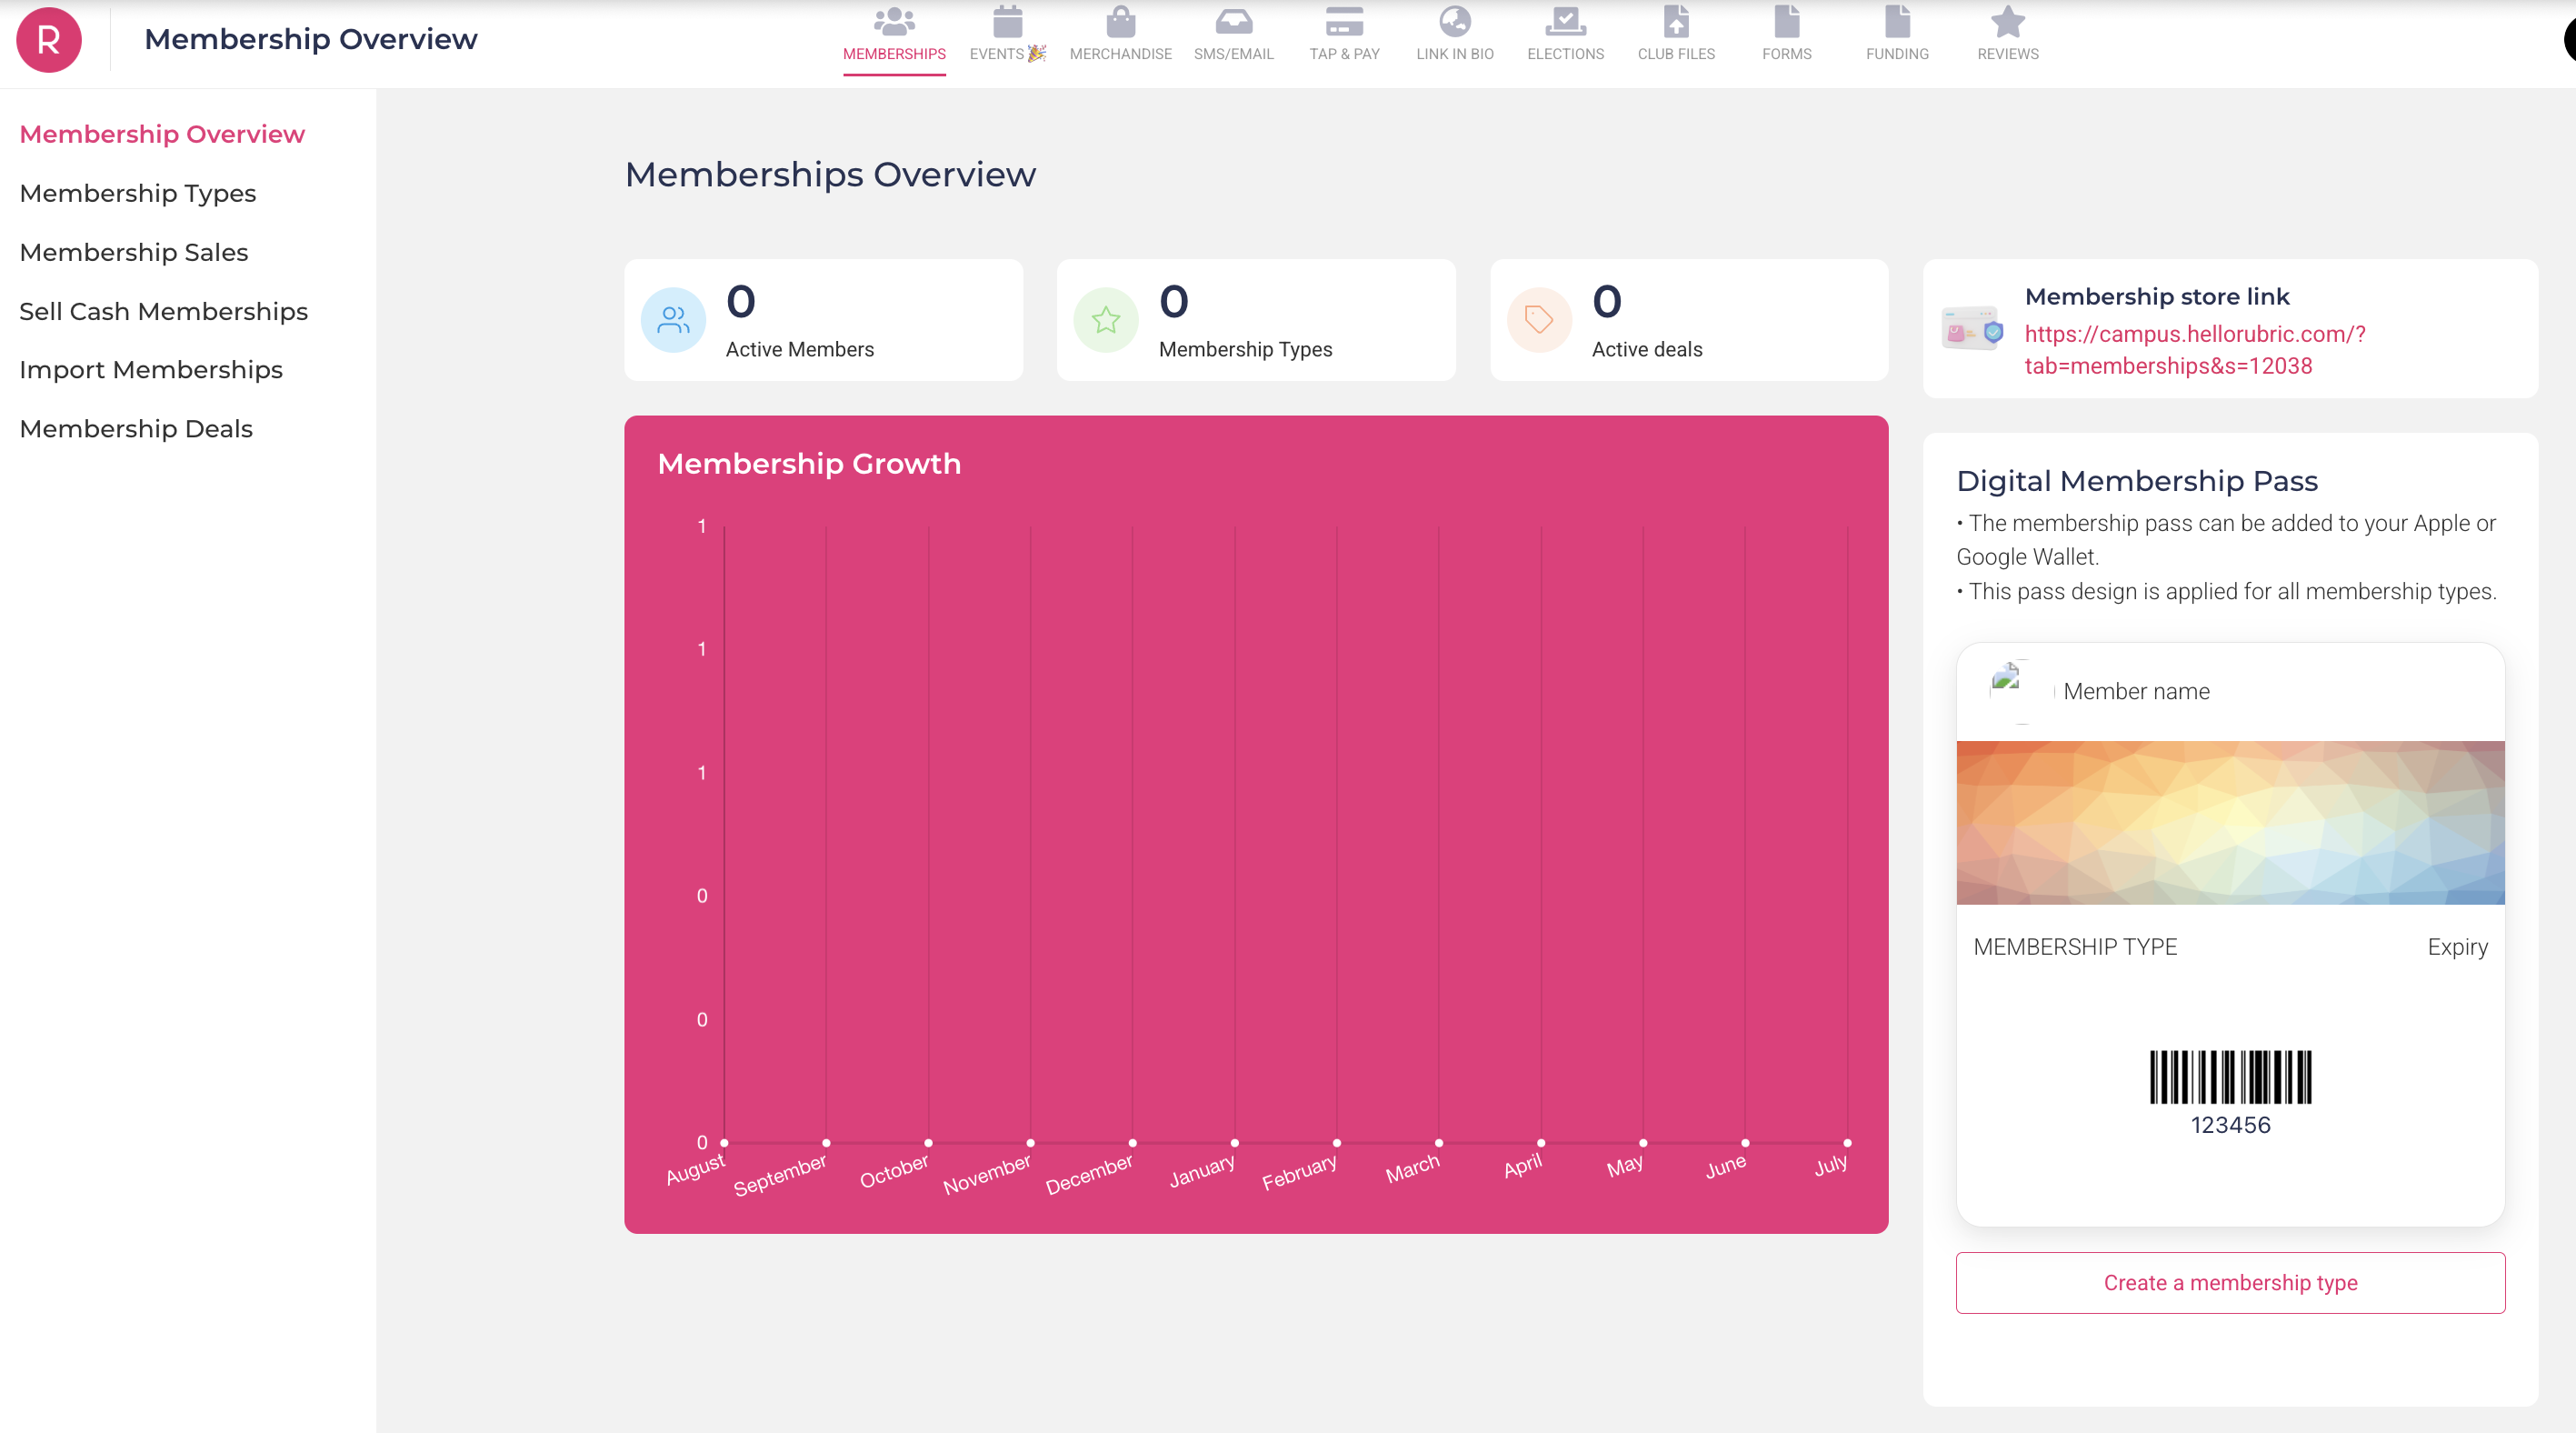
This is your **Membership Overview** page. It shows a plethora of information, including:

- **Digital Membership Pass** - This digital membership pass is downloadable by all your active members of your club, and can be used for attendance at events or meetings. More details can be found further down.
- **Membership** **Growth** - This graph shows the number of members that register with your club in a given year, broken down month-by-month.
- **Membership Total** - The number of "Active" members is the current, total members in your group.

### <span style="color: rgb(20, 156, 235);">Membership Management</span>

Organizing your membership is broken down into three key elements: making membership types, editing membership types, and managing your membership information.

#### <span style="color: rgb(0, 0, 0);">Creating/Editing Membership Types</span>

When first creating membership types, we need to consider a few different factors:

- What **membership types** are outlined in our constitution? (General, Executive, Associate, etc)
- How do our members **engage** with our organization? (Volunteers, Event Attendees, etc)
- How do we want to attract **interested people** to our club? (Prospective Members, Newsletter Subscribers, etc)

Once you have an idea of how you want to manage your members, you can create a new membership type:

1. On the left-bar, click on "Membership Types"
2. Above the display table, click on "Create Membership" and select "New Membership Type"

When creating your memberships, there are a couple different fields that need to be established:

- **Name** - The formal **title** of a given member. This is what will be displayed on their **Digital Membership Pass.**
- **Validity** - The length of time a membership is **valid** for from the **date of purchase/joining**. <span style="color: rgb(224, 62, 45);">Memberships cannot last longer than **one year**.</span>
    - Note that you will use the **custom field** setting to set the end-date.
- <span style="color: rgb(0, 0, 0);">**Membership Price** - The **cost** of being this type of membership. Groups can elect to have membership be free ($0.00) or they can set a price.</span>
    - <span style="color: rgb(0, 0, 0);">Note that Rubric has **transaction fees** that can either be paid by the group, or it can pass onto the buyer.</span>
- **<span style="color: rgb(0, 0, 0);">Membership Description</span>**<span style="color: rgb(0, 0, 0);"> - The general **information** about this type membership, what benefits it includes, and what responsibilities this membership type has. It is recommended that groups have them written in their constitution.</span>

<p class="callout danger">**NOTICE:** Groups that are found with a type whose **validity** exceeds one year will have members of that type be **disqualified** from their total member count.</p>

<span style="color: rgb(0, 0, 0);">There is also a **Membership Sign-Up** Form that members will fill out when becoming a member of a given type.</span>

- **<span style="color: rgb(0, 0, 0);">Required Information</span>**<span style="color: rgb(0, 0, 0);"> - All membership types will require the Name, Email, and Enrolment Status of a member.</span>
- **<span style="color: rgb(0, 0, 0);">Optional</span>**<span style="color: rgb(0, 0, 0);"> **Information** - Rubric has pre-made form questions (i.e. degree, year of study) that groups can opt-in to use for their membership types. <span style="color: rgb(224, 62, 45);">Under no circumstances can you request Student Identification Numbers (ID).</span></span>
- **Additional Questions** - You can add customizable questions (optional or mandatory) at the end of the form. Including drop-downs, checkboxes, multiple-choice, or text-based answer fields.
- **Terms &amp; Conditions** - A brief description outlining the terms &amp; conditions of memberships, and acquiring this type of membership. We recommend student groups add their expectations for **good standing** here.

At the end of the membership creation page, there is a **Manual Membership Approval** toggle. This means that when people choose a specific type of membership, you need to **approve** them from the main membership page before they are added. Note that this toggle **cannot be turned** **off** after the membership is created (or vice versa).

Once you finished creating a membership type, it will appear in the original Membership Type chart:

[![Screenshot 2025-07-23 at 2.56.12 PM.png](https://s3.su.ualberta.ca/docs/uploads/images/gallery/2025-07/fRNdzQ4Gx1w7jdrc-screenshot-2025-07-23-at-2-56-12-pm.png)](https://s3.su.ualberta.ca/docs/uploads/images/gallery/2025-07/fRNdzQ4Gx1w7jdrc-screenshot-2025-07-23-at-2-56-12-pm.png)
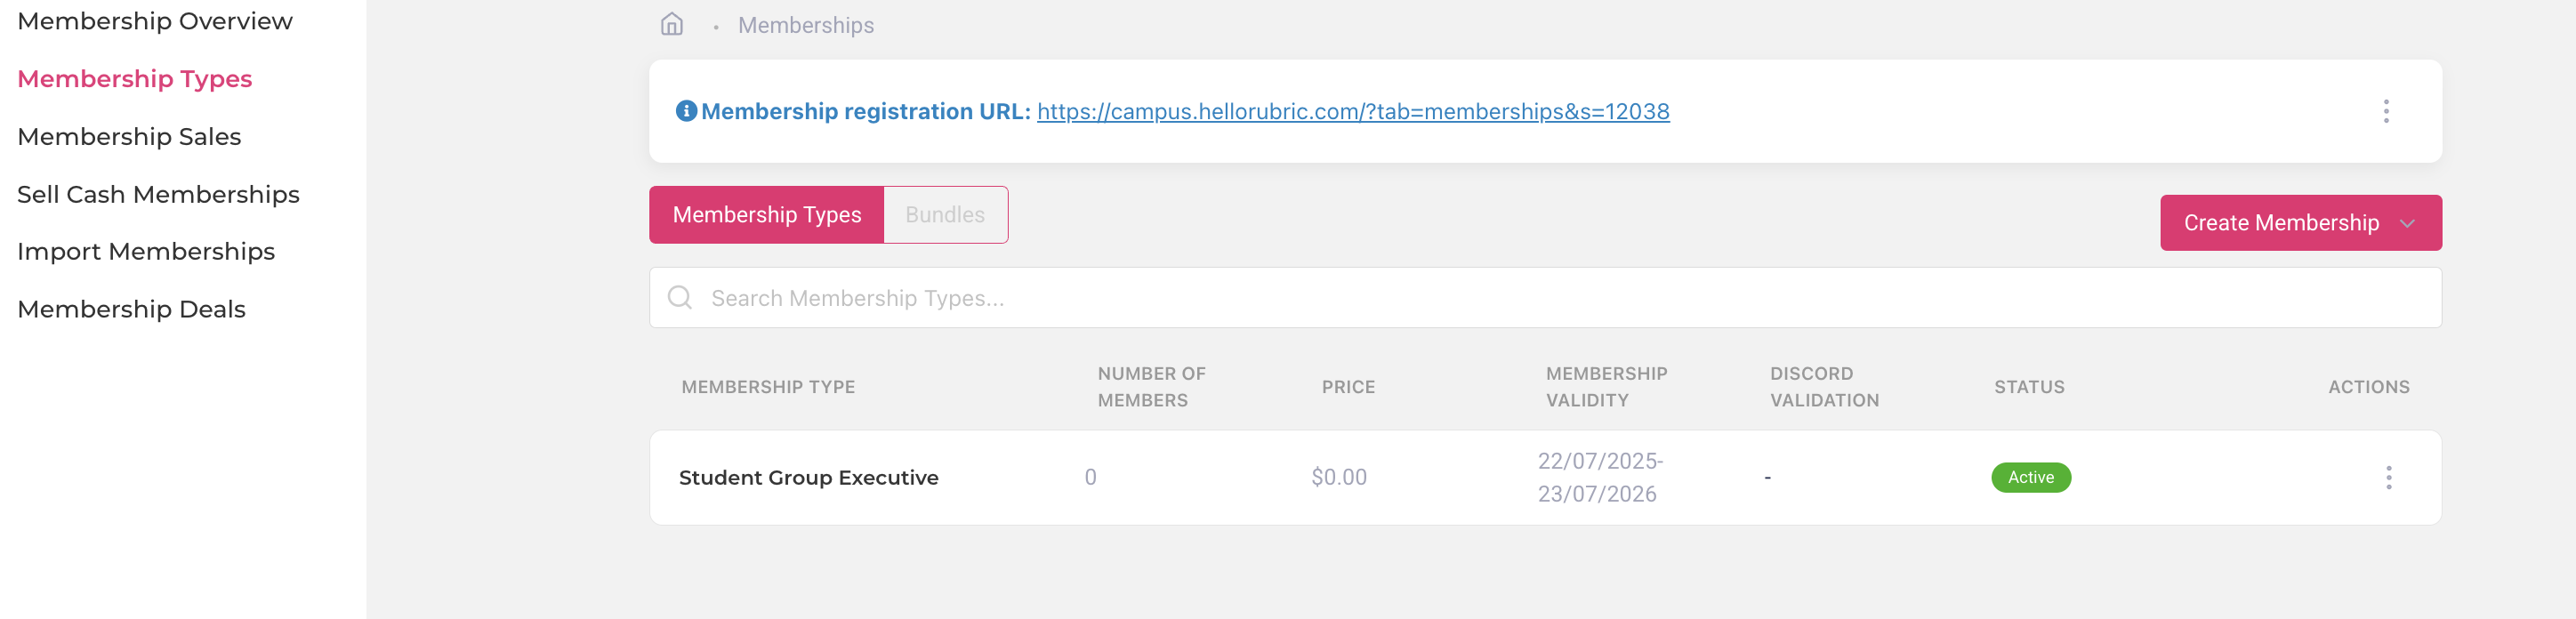
The **status** of a membership type indicates whether or not someone can **view it on your homepage.** This can be toggled using the "ACTIONS" feature on the far right-hand side of a membership type.

- **Active -** Members are able to view the membership and join (or request to join) using your homepage.
- **Hidden** - Members are only able to join this membership if they are **imported** or **invited**. Further instructions on how to do so are down below.

If you want to **edit** a membership type, click the three-dots on the furthest right-hand side, and click "Edit".

#### <span style="color: rgb(0, 0, 0);">Managing Members</span>

Now that you have membership type(s), you can **add** members. There are three distinct ways people can join a student group: voluntary sign-up, mass upload, or individual upload.

First, lets start with **voluntary** sign-up.

1. Navigate to the "Membership Types" tab
2. For the membership type of interest, ensure it is **active**.
3. Click on "Link in Bio" in the middle of the top navigation bar.
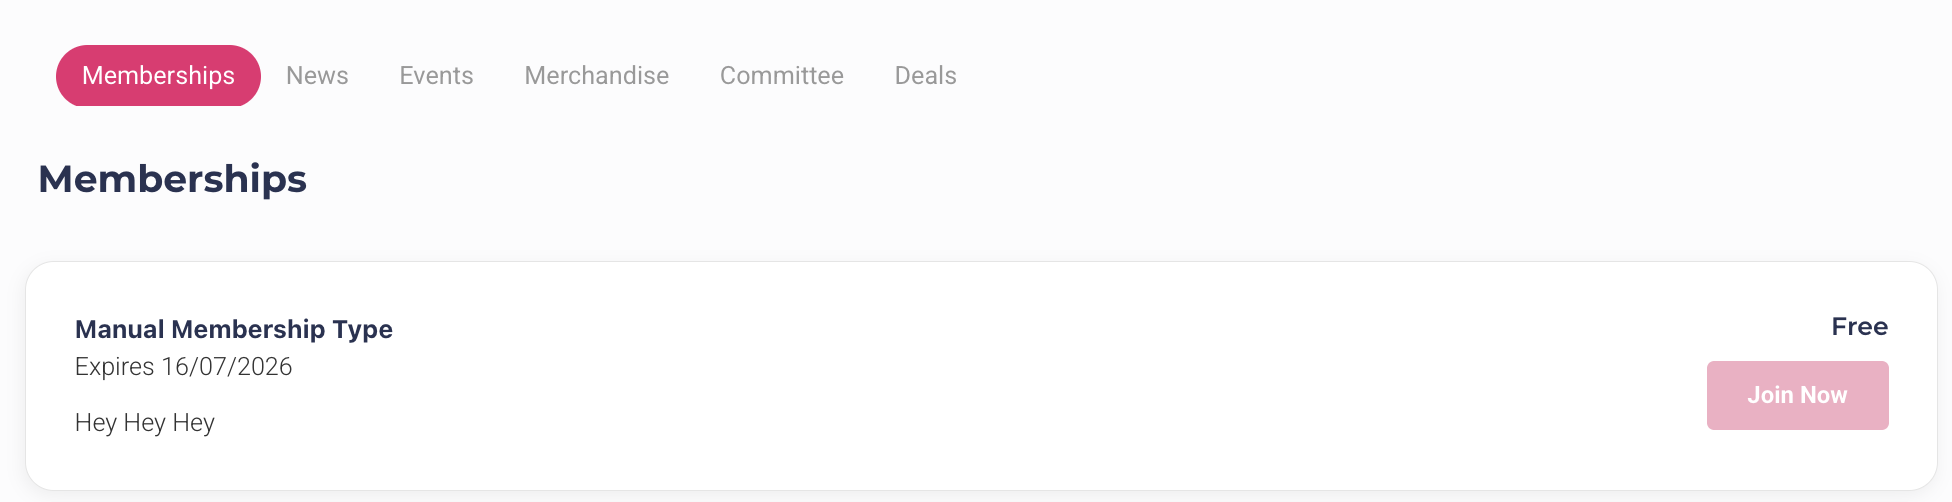
4. Under "Memberships" on the club page, you will be able to view all memberships that are **public facing**. 
    - If you are viewing the club page as an **editor**, the "Join Now" button will be desaturated. This does not impair someone's ability to join your club.
5. Share your group's "link in bio" with prospective members so they can voluntarily select the membership type they are interested in. 
    - If a membership type is set to **manual** **approval**, individuals who joined will need to have their request approved under the "Membership Sales" tab by an executive (with permissions) to be fully.

[![Screenshot 2025-07-23 at 3.53.29 PM.png](https://s3.su.ualberta.ca/docs/uploads/images/gallery/2025-07/xZ9Ss7SbsEi5WRyL-screenshot-2025-07-23-at-3-53-29-pm.png)](https://s3.su.ualberta.ca/docs/uploads/images/gallery/2025-07/xZ9Ss7SbsEi5WRyL-screenshot-2025-07-23-at-3-53-29-pm.png)
For **almost all groups,** they will need to have a way of manually adding either an **entire group** of members or a **few individuals** to their General Membership Tier. Typically, groups have requirements for being a General Member (e.g. attendance, enrolment status, degree program, fee payment etc) that should be confirmed before someone is granted a certain tier of membership. Once you've confirmed someone is eligible to join a certain tier, you can upload them individually to that tier.  
  
If you want to **individually upload** members...

1. Navigate to the "Membership Types" tab
2. On the left side-bar, click on "Sell Cash Memberships"
3. Fill out the appropriate sections of the member's reported information. 
    - If the membership type is free, select **cash** as the payment method.
    - Members can only be added to **one** membership at a time.
4. Click "submit order".
5. Double check under "Membership Sales" that the member's information was added.

Note that, for any fields that are mandatory for a membership type (e.g. mandating students report their degree) students must fill out and accept an invitation email in order to be marked as “approved” rather than “pending”. This will be sent to the email of the member.

If you want to upload an **entire roster** of members....

1. Navigate to the "Membership Types" tab
2. On the left side-bar click on "Import Memberships"
3. You will be prompted to upload a spreadsheet; download Rubric's template. The template should automatically include the categories of information that the membership type collects. 
    - This will be downloaded as a **csv. file** - you will need to convert it to a spreadsheet (**xlxs. or xls.**) to properly complete it. Please use Microsoft Excel or Google Sheets for this, as Apple Numbers does not work.
4. In your spreadsheet, add a **column** for every category of information you are collecting from your members if it was not already included in the template. 
    - An example would be; Name, Enrollment Status, UAlberta Email, Year of Study, cGPA, etc.
5. Select the membership type you want to import these members to (you can only do one at a time).
6. Once you finish with the information, convert it **back to a** **csv. file** and add it to the upload page. 
    - If there are issues with the upload, ensure that only **named headers and data** are in the table.
7. Navigate back to "Membership Sales" to ensure all information was transferred correctly.

If you cannot view members in the “approved” section, they might be in the “pending” tab.

<p class="callout info">You can find a **General Member Template** at the bottom of this page.</p>

#### Member Information

Collecting and managing the information of your members is an essential process for all organizations, not just student groups, which leads to higher rates of longevity. Rubric provides four crucial features: managing and filtering membership information, manually adding individual members, importing member rosters, and exporting membership rosters.

To find your current list of members and their information...

1. Click on the "Memberships" tab in the top navigation bar.
2. On the left-bar, click on "Membership Sales"
3. If you have current Active members, you should be presented with a **table**.

There are a few prominent details this table present represented by the table **columns.** Each column (described by their header) represents the information for any field (question) in **any membership** **type**. All membership types will have the mandatory fields, but the more complex the membership, the more information Rubric will store.

- The name, email, and enrolment status are **all** mandatory.
- The **membership ID** is a randomly generated number for that membership type when assigned to an individual.
- The **payment method** represents how the membership was processed (Rubric, manually, cash/in-person, etc).
- The **status** changes only if the membership has a **fee**; when the payment is processed, it is considered **paid**. 
    - All **free** memberships will be marked as **paid** when fully approved.
- The date **purchased** and date **updated** indicate when the membership was first assigned, and last edited.
- **Additional columns** will be generated for memberships with **additional questions**.

Within the furthest left column of the table, there is an **Action** field. There are three options depending on the membership type:

1. **Edit** - Allows you to edit the fields and information of a given membership. Note that some fields are not able to be edited if they are self-reported rather than selected.
2. **Cancel Membership** - Allows you to remove someone's membership. These memberships will be moved to the **expired** tab above the table.
3. **Approve Membership** - Allows you to approve someone's membership if the membership type is set to **manual approval**.

To see memberships that are **pending** or **expired**, be sure to toggle to the right tab (as illustrated in the red box below).

[![Screenshot 2025-07-23 at 3.40.11 PM.png](https://s3.su.ualberta.ca/docs/uploads/images/gallery/2025-07/zvXJ4Tn9rhG9TVGs-screenshot-2025-07-23-at-3-40-11-pm.png)](https://s3.su.ualberta.ca/docs/uploads/images/gallery/2025-07/zvXJ4Tn9rhG9TVGs-screenshot-2025-07-23-at-3-40-11-pm.png)

Above the tables is the "Search" bar - which allows you to filter for any information within a given membership. This includes things like the name of a membership type, the name of a member, the year of study, paid or upaid memberships, and so on. At the bottom of the table, you can **export** (download) the table, and Rubric will provide the **filtered** version if there is a query in the search bar.

---

### <span style="color: rgb(20, 156, 235);">Digital Membership Pass</span>

<span style="color: rgb(0, 0, 0);">The **Digital Membership Pass** is downloadable for all members of your student group, regardless of their membership type. It can be added to digital wallets as a means of attending events and tracking attendance; it includes their unique **member ID** **number**.</span>

<span style="color: rgb(0, 0, 0);">This feature is also customizable. To edit your Digital Membership Pass...</span>

1. <span style="color: rgb(0, 0, 0);">Click on "Membership Overview"</span>
2. <span style="color: rgb(0, 0, 0);">On the right-hand side, click on "Edit Pass" under the draft membership pass.</span>

<span style="color: rgb(0, 0, 0);">From there, you can edit a few **key features:**</span>

- **<span style="color: rgb(0, 0, 0);">Colours: </span>**<span style="color: rgb(0, 0, 0);">Including the background, font, and border colours. This is done using hexadecimal colour codes.</span>
- **<span style="color: rgb(0, 0, 0);">Logo</span>**<span style="color: rgb(0, 0, 0);"> Image: The logo of your group, or an adjacent one for members.</span>
- **<span style="color: rgb(0, 0, 0);">Strip</span>**<span style="color: rgb(0, 0, 0);"> Image: The header that is branded across the top-half of the membership pass.</span>
    - <span style="color: rgb(0, 0, 0);">Note that for images, Rubric only accepts **PNGs**.</span>
- <span style="color: rgb(0, 0, 0);">Group **URLs**: You can link your group's Rubric page, or other external pages.</span>

<span style="color: rgb(0, 0, 0);">Don't forget to save all your changes before exiting the page!</span>

---

### <span style="color: rgb(20, 156, 235);">Membership Templates</span>

Here you can find **membership type templates** suitable for Rubric, with additional comments explaining the rationale. Student groups are encouraged to utilize these templates as they set up or reorganize their student group pages on the platform.

#### Prospective Member

Having a type for prospective members is a great way of having a low-commitment trial for students interested in joining your organization. This is also a great way to ensure that your **General Members** are formally recognized in an invite-only type, and are distinctively separate from people who do **not** meet requirements of membership as outlined in your constitution. You can also opt to transfer prospective members who do not meet requirements of general membership to the Associate Member type, as outlined below.

<table border="1" id="bkmrk-validity--%C2%A01-semeste" style="border-collapse: collapse; width: 100%;"><colgroup><col style="width: 25.958%;"></col><col style="width: 74.042%;"></col><col style="width: 0.0009656%;"></col></colgroup><tbody><tr><td style="height: 80.1953px;">Validity - **1 Semester**</td><td colspan="2" style="height: 80.1953px;">To avoid a backlog of interested people who initially sought out your club but lost interest, set the membership to last a **short time**. Then, those who meet membership requirements by the end of the semester can be transferred over to your **general member type**. Anyone who does not meet the requirements can renew prospective member status, or change to an associate member.

</td></tr><tr><td style="height: 35.3984px;">Price - **$0.00**</td><td colspan="2" style="height: 35.3984px;">Charging a fee for a prospective membership will (most likely) lead to a lack of interest. The price is up to the **discretion** of the student group; note that Rubric has a **transactional** fee for any purchases on their platform.

</td></tr><tr><td style="height: 80.1953px;">Description</td><td colspan="2" style="height: 80.1953px;">Descriptions should match what is outlined in the **constitution** of the organization. An example is as follows:

*Interested in joining our student group? Prospective members get all our communications for upcoming ways to get involved - including volunteering, events, and more! Sign up now to find out if \[Student Group Name\] is the right fit for you! Please note that prospective members do not have voice or vote in group matters until they become general members.*

</td></tr><tr><td style="height: 80.1953px;">\[OPTIONAL\]

Terms &amp; Conditions

</td><td colspan="2" style="height: 80.1953px;">You can add a terms and conditions if you feel the need to stress any additional information, or conduct of students. An example is as follows:

*By obtaining this membership, you agree to abide by our group’s Constitution, and all policies of the University of Alberta and \[Student's Union/Graduate Student's Association\]. Failure to abide by these policies may result in the following but not limited to: bad standing, suspension of membership, and expulsion from the group. In order to upgrade to general membership status, you must be currently enrolled as a University of Alberta students, attend at least one event in the past semester, and be in good standing.*

</td></tr><tr><td style="height: 46.5938px;">Viewing - **Active**</td><td colspan="2" style="height: 46.5938px;">Set the membership to **active** so anyone on Rubric can view and join automatically!

</td></tr><tr><td style="height: 176.43px;">\[OPTIONAL\] Additional Questions</td><td colspan="2" style="height: 176.43px;">Additional questions are a great way to understand the general reputation of your organization. Here are some examples:

- How did you hear about us? (Instagram, Clubs Fair, etc...)
- What are you looking to get out of our club? (Leadership opportunities, volunteer opportunities, community, niche hobby, etc...)

Additional questions are great if you have more information required for recognizing your members, or for getting some **statistics** for your club! Some examples include:

- Faculty (Science, Engineering, Arts, Education, etc)
- How did you hear about us? (Clubs Fair, Instagram, Word of Mouth, etc)
- What year of study are you currently enrolled in? (1st, 2nd... 5th+)
- Have you been a member with our club before?

The additional questions can be **formatted** depending on the answers you are interested in obtaining (multiple choice, select-all, dropdown, short answer, etc).

We strongly recommend making these sections *optional*.

</td></tr></tbody></table>

#### General Member

General Members are a type of membership that includes all **University of Alberta students who are members** (including executives). There can be additional requirements to become a general member of the group as outlined in your constitution.

<table border="1" id="bkmrk-validity--%C2%A01-year-me" style="border-collapse: collapse; width: 100%; height: 728.594px;"><colgroup><col style="width: 25.6174%;"></col><col style="width: 74.5062%;"></col><col style="width: 0%;"></col></colgroup><tbody><tr style="height: 57.7969px;"><td style="height: 57.7969px;">Validity - **1 Year**</td><td style="height: 57.7969px;">Members must re-register with their student groups on an **annual** basis. All membership types **must** **expire** after one year.

</td><td style="height: 57.7969px;">  
</td></tr><tr style="height: 57.7969px;"><td style="height: 57.7969px;">Price - **$0.00**</td><td colspan="2" style="height: 57.7969px;">The price is up to the **discretion** of the student group; note that Rubric has a **transactional** fee for any purchases on their platform.

</td></tr><tr style="height: 147.391px;"><td style="height: 147.391px;">Description</td><td colspan="2" style="height: 147.391px;">Descriptions should match what is outlined in the **constitution** of the organization. An example is as follows:  
  
*General Members are any currently enrolled University of Alberta students, who have attended at least one event in the past semester, and are in good standing. General members are able to vote in all group matters.*

</td></tr><tr style="height: 169.789px;"><td style="height: 169.789px;">\[OPTIONAL\]

Terms &amp; Conditions

</td><td colspan="2" style="height: 169.789px;">A terms and conditions section is a great way of outlining **good** **&amp; bad standing** for your student group. An example is as follows:  
  
*By obtaining this membership, you agree to abide by our group’s Constitution, and all policies of the University of Alberta and \[Student's Union/Graduate Student's Association\]. Failure to abide by these policies may result in the following but not limited to: bad standing, suspension of membership, and expulsion from the group.*

</td></tr><tr style="height: 80.1953px;"><td style="height: 80.1953px;">Viewing - **Hidden**</td><td colspan="2" style="height: 80.1953px;">General Membership is for verified members of your student group that meet the requirements as outlined in your constitution. If you **hide** the membership, only people you **invite** can join.

</td></tr><tr style="height: 215.625px;"><td style="height: 215.625px;">\[OPTIONAL\] Additional Questions</td><td colspan="2" style="height: 215.625px;">Additional questions are great if you have more information required for recognizing your members, or for getting some **statistics** for your club! Some examples include:

- Faculty (Science, Engineering, Arts, Education, etc)
- How did you hear about us? (Clubs Fair, Instagram, Word of Mouth, etc)
- What year of study are you currently enrolled in? (1st, 2nd... 5th+)
- Have you been a member with our club before?

The additional questions can be **formatted** depending on the answers you are interested in obtaining (multiple choice, select-all, dropdown, short answer, etc).

</td></tr></tbody></table>

#### Associate Member

Having a type for associate members is a great way of keeping track of individuals who might not want to be general members, or might not even be eligible to become general members, but want to stay in the loop with what your club is up to.

<table border="1" id="bkmrk-validity--%C2%A0custom-ra" style="border-collapse: collapse; width: 100%;"><colgroup><col style="width: 26.0816%;"></col><col style="width: 73.9184%;"></col><col style="width: 0.0009656%;"></col></colgroup><tbody><tr><td>Validity - **Custom Range**</td><td colspan="2">Set the range to a **custom** date that expires when your annual event calendar resets; a good date would be the date of your upcoming annual elections, or the end of the academic year. Please note that if you allow lifetime associate memberships, you may have to remove folks if your membership ratio no longer satisfies the requirements of student group recognition.

</td></tr><tr><td>Price - **$0.00**</td><td colspan="2">Charging a fee for an associate membership will (most likely) lead to a lack of interest.

</td></tr><tr><td>Description</td><td colspan="2">Descriptions should match what is outlined in the **constitution** of the organization. An example is as follows:  
  
*Associate Members are members of the community who do not meet General Membership requirements due to their lack of student status or inability to commit to other requirements of membership. Associate Members have no voice or vote in group matters.*

</td></tr><tr><td>\[OPTIONAL\]

Terms &amp; Conditions

</td><td colspan="2">A terms &amp; conditions section is a great way of outlining the expectations of volunteers:

*By obtaining this membership, you agree to abide by our group’s Constitution, and all policies of the University of Alberta and \[Student's Union/Graduate Student's Association\]. Failure to abide by these policies may result in the following but not limited to: bad standing, suspension of membership, and expulsion from the group.*

</td></tr><tr><td>Viewing - **Approval**

\[OPTIONAL\]

</td><td colspan="2">Set the membership to **manual approval** so anyone can show interest in joining the group, but will need to have it be **approved** (application looked over) before they are accepted.

</td></tr><tr><td>\[OPTIONAL\] Additional Questions</td><td colspan="2">Additional questions are great if you have more information required for recognizing your members, or for getting some **statistics** for your club! Some examples include:

- Faculty (Science, Engineering, Arts, Education, etc)
- How did you hear about us? (Clubs Fair, Instagram, Word of Mouth, etc)
- What year of study are you currently enrolled in? (1st, 2nd... 5th+)
- Have you been a member with our club before?

The additional questions can be **formatted** depending on the answers you are interested in obtaining (multiple choice, select-all, dropdown, short answer, etc).

</td></tr></tbody></table>

# Campaigns & Messages

### <span style="color: rgb(20, 156, 235);">Using Communications</span>

Rubric allows **affiliated** student groups to create and send out mass messages to their members. You're able to choose from their pre-made templates, create your own, or schedule a communication to be sent out within a given time period. Ensure that you have completed the **<span style="color: rgb(194, 224, 244);">[<span style="color: rgb(20, 156, 235);"><span style="color: rgb(53, 152, 219);">first steps</span></span>](https://docs.su.ualberta.ca/books/student-group-services/page/logging-in-as-a-club)</span>** to setting up your group page before proceeding to this feature.

There are two options for communications on the Rubric platform: email messages and text messages. We strongly recommend only using the email messaging system, as all students and staff at the University of Alberta are provided with a (@ualberta.ca) email, making it the most universal method of communication on campus.

#### Creating Messages

To access the communications feature for your student group, log in via your user account and switch to the **club management page**. If you are not set up as a club executive, [refer to this page.](https://docs.su.ualberta.ca/books/student-group-services/page/executive-team)

1. On [hellorubric.com](https://hellorubric.com/), click on the "Login" drop-down and select **Students Portal.**
2. Login with your **UAlberta email** and password.
3. Click on the icon in the top-right of the screen
4. Click on the name of your club.
5. Using the **top navigation bar** on the club management page, click on **SMS/Emails.**

If done correctly, the page should look something like this:

[![Screenshot 2025-07-30 at 10.30.34 AM.png](https://s3.su.ualberta.ca/docs/uploads/images/gallery/2025-07/PmiIFS7FgIiko9J4-screenshot-2025-07-30-at-10-30-34-am.png)](https://s3.su.ualberta.ca/docs/uploads/images/gallery/2025-07/PmiIFS7FgIiko9J4-screenshot-2025-07-30-at-10-30-34-am.png)

<p class="callout info">A collection of templates for email communications can be found at the bottom of this page!</p>

To **create your message**, click "Create New Campaign" in the top-right of the screen.

1. Click "Send free email"
2. You will then pick a template or create your own. 
    - Rubric has its own pre-made (editable) templates from the "Standard" tab.
    - You can also create your own templates using their software, under the "Custom" tab. 
        - Click on "Create New Template" 
            - You can either create your own from scratch using their HTML coding feature.
            - Or, you can create one using their email designer.
    - Make sure you save any templates you create to be able to use them for messages!
3. Once you pick your base template, you will be brought to the edit screen.

### [![Screenshot 2025-07-30 at 10.36.21 AM.png](https://s3.su.ualberta.ca/docs/uploads/images/gallery/2025-07/aDu30tQw49XVRAaO-screenshot-2025-07-30-at-10-36-21-am.png)](https://s3.su.ualberta.ca/docs/uploads/images/gallery/2025-07/aDu30tQw49XVRAaO-screenshot-2025-07-30-at-10-36-21-am.png)

In order to send the email, you'll need to fill out the appropriate fields:

1. **Select recipients:** You must select one or more recipient group. Rubric will send the campaign to the email address of all members in the selected group. This can be membership groups, event attendees, elections voters, etc.
2. **Start sending emails on:** You must select the start date for an email to be delivered to a member's inbox. Note that only **one** email will be sent to each member during this time; it will not be a recurring communication.
3. **Stop sending emails on**: You must select the stop date for an email to be delivered to a member's inbox. 
    - If you would like to send a welcome email to all new members, choose a stop date that coincides with the end of your membership period.
    - If you would like to send a one-time campaign to all users that are currently in the selected membership type(s), choose a stop date shortly after the start date.
4. **Email Subject**: You must write out the email subject line.
5. **Design email**: From here, you can customize the content of the email itself, utilizing the template you selected earlier.
6. **Test Email Address:** You can send the current version of the campaign to an email address to review the content in your email client or get approval from another individual (i.e. formatting, links redirecting properly, assets fully loading).

You can also save the email as a draft before officially sending it out! All executives can view previously sent or drafted communications from the initial SMS/Email tab.

#### Designing your email

There are many ways to customize emails depending on the needs of your student group, whether created from scratch or from a template. By clicking the "+" button in the top-left of the visualization tool, you can click and add different elements, such as text boxes, headers, links, buttons, dividers, spacers, and images in different combinations and columns.

After these elements are added, they can then be further edited. Click on the element in the visualizer, and from the directory that appears...

- **Reorder** - Click and hold on the two lines, moving it up or down.
- **Delete** - Click on the trash can to remove an element.
- **Duplicate** - Click on the overlapping squares to duplicate an element.
- **Edit Code** - If you're versed in HTML, you can edit the code directly in the visualizer.

To reformat a given element...

1. Click on the element in the visualizer.
2. Options will appear in the top-left-hand of the visualizer, near the "+" icon. Some common formatting edits... 
    - Border - Width, Colour and Corner Radius (curvature)
    - Alignment - For text.
    - Text Colour - For text.
    - Link - For adding external URLs.
    - Background - For buttons and blocks.

And don't forget to either save the draft if further edits are needed, or submit when the communication is ready to publish!

#### Scheduling Communications

Once your communications are ready to be sent, you can edit the draft and schedule the start and end date for the email/text message. Any member added to the membership type or recipient list during this time period will receive this communication, so it is very important to schedule these communications appropriately!

For any communication created (duplicate or otherwise), it will show up in the communications table:

[![Screenshot 2025-07-30 at 11.41.53 AM.png](https://s3.su.ualberta.ca/docs/uploads/images/gallery/2025-07/bdOYlD8QtgUKgCHW-screenshot-2025-07-30-at-11-41-53-am.png)](https://s3.su.ualberta.ca/docs/uploads/images/gallery/2025-07/bdOYlD8QtgUKgCHW-screenshot-2025-07-30-at-11-41-53-am.png)

By looking at the list of previously sent or currently drafted communications, you can deduce a few key pieces of information:

1. **Campaign ID:** A unique ID is generated to denote which communication is which. This is good to keep in a separate spreadsheet so your group can keep track of emails running for release at the same time. 
    - For example, two emails titled "EVENT REMINDER" are valid at the same time for two different events.
2. **Type:** Whether the communication is an email or a text.
3. **Subject**: The title of the communication.
4. **Recipients**: The number of recipients who received the communication.
5. **Status:** Whether or not the communication has been sent. 
    - **Draft** - Has yet to be sent; can still be edited.
    - **Pending** - Is in progress of being sent; not all recipients have received the communication or the campaign has not stopped sending yet.
    - **Completed** - All intended recipients have received the communication and the campaign has stopped sending.
6. **Valid from/to**: The duration of time during which a member can receive a communication. Even if someone is added to the membership list *after* the communication is initially sent, they can receive the communication as long as the end-date has not passed.
7. **Actions:** Allows you to manage a communication in one of the following ways: 
    - **Details** - Gives you the performance of the communication, including delivery, open, and click rates.
    - **Edit** - Allows you to edit the communication.
    - **Archive** - Locks the communication from further editing or viewing.
    - **Duplicate** - Copies the contents of a communication without sending it again.

### <span style="color: rgb(20, 156, 235);">General Recommendations</span>


When it comes to communications, having a unified look is ideal to create memorable marketing for your group. Here are a few key concepts to think about...

1. **Brand Colours** - Having a hexadecimal colour palette for your group helps make it visibly identifiable amongst the plethora of marketing on campus, and makes it easier to design communications that are consistent. In general, you should have... 
    - **Primary Colour(s)** - A maximum of two bold colours for your group, not in the same colour family. Examples include red and white, blue and gold, etc.
    - **Secondary Colour(s)** - A maximum of three subdued colours for your group, with the same undertones as your primary colours. Examples include beige, white, lavender, etc.
2. **Crests &amp; Logos** - Your group's logo, generally also set as your profile picture, should be visible in every communication. We recommend including it at the very beginning of every email. It should be simple, with a key object or visual element that unifies it with the group's brand.
3. **Scheduling Communications** - No one wants an email at 5 AM. Therefore, you should schedule your email to start sending at prime open times, such as 9 AM or even 5 PM. Play around with your times every semester to see what the ideal timing for your group is, but ensure you keep it consistent for a few months so people anticipate its arrival.

### <span style="color: rgb(20, 156, 235);">Communication Templates </span>


Here you can find communication templates suitable for Rubric, with additional comments explaining the rationale. Student groups are encouraged to utilise these templates as they begin publicising their group. As a reminder, you can also duplicate and save any previous communications as templates for ease of access in the future!

#### Welcome to the Club!

<table border="1" id="bkmrk-recipients-all-membe" style="border-collapse: collapse; width: 100%; height: 119.188px;"><colgroup><col style="width: 13.718%;"></col><col style="width: 86.282%;"></col></colgroup><tbody><tr style="height: 29.7969px;"><td style="height: 29.7969px;">**Recipients**</td><td style="height: 29.7969px;">All membership types are applicable (i.e. general, associate)</td></tr><tr style="height: 29.7969px;"><td style="height: 29.7969px;">**Start Date**  
</td><td style="height: 29.7969px;">Early, as soon as possible</td></tr><tr style="height: 29.7969px;"><td style="height: 29.7969px;">**End Date**  
</td><td style="height: 29.7969px;">At the end of the school year, or your events calendar for that year.</td></tr><tr style="height: 29.7969px;"><td style="height: 29.7969px;">**Email \[SUBJ\]**  
</td><td style="height: 29.7969px;">*Welcome to \[CLUB NAME\]!*  
</td></tr><tr><td>**Formatting**</td><td>- \[Image\] - *Club Logo*
- \[Header\] - Add a catchy heading, such as 'This year is looking big and bold!'
- \[Text\] - Add additional context, such as big events, accomplishments, number of current members, money raised last year, etc.
- \[Image &amp; Header\] - *Club Executive,* A Message From Our Executives
- \[Text\] - A general introduction to your new executive team to achieve personability.
- \[Social Media\] - Add any applicable links

Don't forget to format any colours or alignments to suit your group's brand!

</td></tr><tr><td>**Reasoning**</td><td>Setting up a *Welcome to the Club* email means that a message can be sent to any newly added members at any given time. This allows you to provide them with the basic overview of your club, any upcoming events, and how to get involved. </td></tr></tbody></table>

#### Bi-Weekly Newsletter

<table border="1" id="bkmrk-recipients-general-m" style="border-collapse: collapse; width: 100%; height: 195.578px;"><colgroup><col style="width: 13.5972%;"></col><col style="width: 86.4028%;"></col></colgroup><tbody><tr style="height: 29.7969px;"><td style="height: 29.7969px;">**Recipients**</td><td style="height: 29.7969px;">General Members, Associate Members</td></tr><tr style="height: 29.7969px;"><td style="height: 29.7969px;">**Start Date**  
</td><td style="height: 29.7969px;">The start of the first week. Example: Monday, 8:00 AM</td></tr><tr style="height: 29.7969px;"><td style="height: 29.7969px;">**End Date**  
</td><td style="height: 29.7969px;">The end of the second week. Example: Sunday, 8:00 AM</td></tr><tr style="height: 29.7969px;"><td style="height: 29.7969px;">**Email \[SUBJ\]**  
</td><td style="height: 29.7969px;">*\[DATE\] - What's New With \[CLUB NAME\]*  
</td></tr><tr style="height: 29.7969px;"><td style="height: 29.7969px;">**Formatting**</td><td style="height: 29.7969px;">- \[Image\] - *Club Logo*
- \[Header\] - Add a catchy heading, such as 'Snow Can't Keep us Down!"
- \[Text\] - Add additional context, such as the three key up-and-coming events, important reminders, etc.
- \[Image &amp; Header\] - *Member Spotlight,* Name of the Member
- \[Text\] - Highlight a key moment or individual from your club to boost engagement.
- \[Social Media\] - Add any applicable links

</td></tr><tr style="height: 46.5938px;"><td style="height: 46.5938px;">**Reasoning**</td><td style="height: 46.5938px;">Biweekly newsletters allow your group to send relevant information to members during a specific timeframe to provide up-to-date information. Rubric *cannot* schedule a recurring communication. You'll have to create a template, and add relevant content every time it needs to be sent out, changing the start and end date accordingly.</td></tr></tbody></table>

#### Upcoming Event

<table border="1" id="bkmrk-recipients-event-att" style="border-collapse: collapse; width: 100%;"><colgroup><col style="width: 13.5972%;"></col><col style="width: 86.4028%;"></col></colgroup><tbody><tr><td style="height: 29.7969px;">**Recipients**</td><td>Event Attendees, General Members, Associate Members</td></tr><tr><td style="height: 29.7969px;">**Start Date**  
</td><td>The day your event is approved, and RSVPs are available.</td></tr><tr><td style="height: 29.7969px;">**End Date**  
</td><td>The day before or the day that your event occurs. </td></tr><tr><td style="height: 29.7969px;">**Email \[SUBJ\]**  
</td><td>*The \[Event Name\] Is Upon Us!*  
</td></tr><tr><td>**Formatting**</td><td>- \[Image\] - *Club Logo*
- \[Header\] - \[Event Name\]
- \[Text\] - Add additional context, such as the location, reminder of payment or dress-code, the fundraising purpose, etc.
- \[Button\] - *Link to Google Form*, RSVP now!
- \[Text\] - Add more information, such as attendees with plus ones, or event goals for the fundraising total.
- \[Social Media\] - Add any applicable links

</td></tr><tr><td>**Reasoning**</td><td>These upcoming event reminders serve as a way of boosting engagement and kindly reminding members of their commitments. You could even include exclusive discounts for events that require payment to encourage folks to come to the event and stay in the loop about future events.</td></tr></tbody></table>

#### Elections Information

<table border="1" id="bkmrk-recipients-general-m-1" style="border-collapse: collapse; width: 100%; height: 420.586px;"><colgroup><col style="width: 13.5972%;"></col><col style="width: 86.4028%;"></col></colgroup><tbody><tr style="height: 29.7969px;"><td style="height: 29.7969px;">**Recipients**</td><td style="height: 29.7969px;">General Members</td></tr><tr style="height: 29.7969px;"><td style="height: 29.7969px;">**Start Date**  
</td><td style="height: 29.7969px;">The day your election information is due to go out; e.g. beginning of election month.</td></tr><tr style="height: 29.7969px;"><td style="height: 29.7969px;">**End Date**  
</td><td style="height: 29.7969px;">The day before your nominations are due.</td></tr><tr style="height: 29.7969px;"><td style="height: 29.7969px;">**Email \[SUBJ\]**  
</td><td style="height: 29.7969px;">\[Club Name\] - \[Year\] Elections</td></tr><tr style="height: 254.805px;"><td style="height: 254.805px;">**Formatting**</td><td style="height: 254.805px;">- \[Image\] - *Club Logo*
- \[Header\] - The \[Year\] Elections Are Right Around the Corner!
- \[Text\] - A general introduction to elections, including why it's important, why officers are important, and what eligible traits are required to vote (i.e. good standing).
- \[Image &amp; Header\] - *Ballot Box*, Important Deadlines
- \[Text\] - Outline the important deadlines, including nomination deadlines, when the vote is being cast, etc.
- \[Button\] - Apply Now!
- \[Image &amp; Header\] - *Executive Team*, Our Committee
- \[Text\] - Basic one-sentence description of each position, with their titles.
- \[Header\] - Have Any Additional Questions?
- \[Text\] - Who to reach out to, i.e. Elections Officer, and how.
- \[Social Media\]

</td></tr><tr style="height: 46.5938px;"><td style="height: 46.5938px;">**Reasoning**</td><td style="height: 46.5938px;">For a group's longevity, elections should be well-engaged with and properly regulated. If you choose to use this template, we strongly suggest using the elections feature on Rubric as well.</td></tr></tbody></table>

# Registration Forms

This page will show you how to **access club registration** on Rubric as a **re-registering** student group, along with the preliminary steps necessary to format all required information for the form.

<p class="callout info">This is considered [step 5 in the process outlined on this page.](https://docs.su.ualberta.ca/books/student-group-services/page/re-registration-form-content-2026) Please ensure all previous steps are completed before beginning the registration form.</p>

Ensure that you have **already set yourself as the primary officer (President)** for the club. If you have yet to complete this step**, [refer to this page](https://docs.su.ualberta.ca/books/student-group-services/page/logging-in-as-a-club).**

The first step is to login to your student account on [hellorubric.com.](https://hellorubric.com)

1. Click the "Login" drop-down and select **Student Portal**.
2. Login with your **UAlberta email** and password.
3. Click the icon in the upper right-hand corner.
4. From the options, click on the name of your **student** **group** under "Switch Accounts". 
    1. You will now be viewing your club page as a **club executive**.

Next, navigate to the correct recognition process.

1. Click on "Forms" in the top navigation bar.
2. Under "Affiliation Processes" click "Student Group Recognition Process." You should select the process for the current calendar year; SGS will inform you if you need to use the process for the previous calendar year.

If done correctly, you should be able to see the form submission page, with the "Submit Form" button:

[![Screenshot 2025-07-17 at 9.35.08 AM.png](https://s3.su.ualberta.ca/docs/uploads/images/gallery/2025-07/MlPJy16fXyuhbdym-screenshot-2025-07-17-at-9-35-08-am.png)](https://s3.su.ualberta.ca/docs/uploads/images/gallery/2025-07/MlPJy16fXyuhbdym-screenshot-2025-07-17-at-9-35-08-am.png)
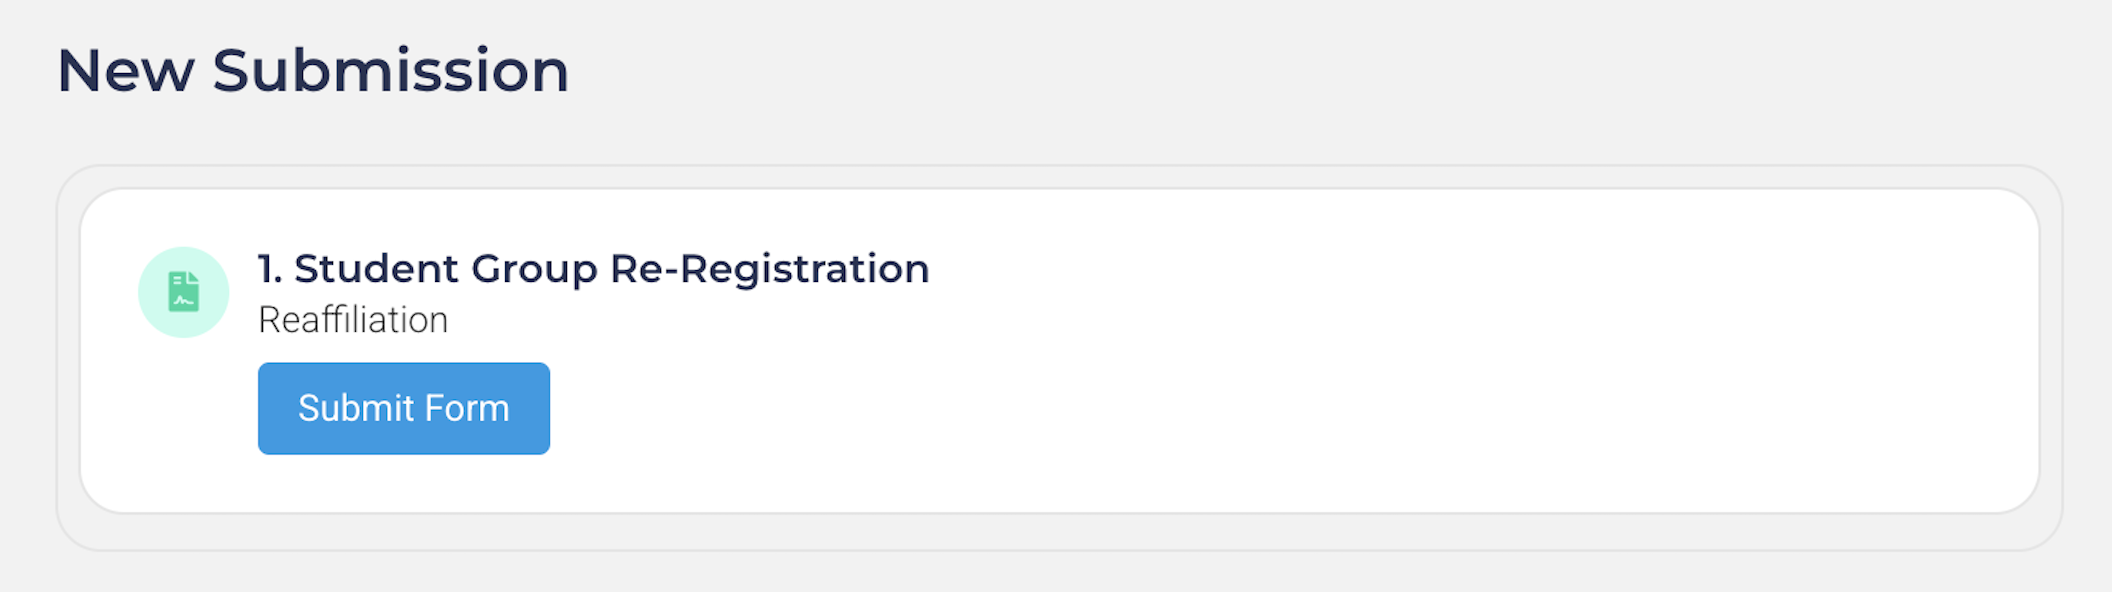
Groups will need to receive **full approval** on their registration BEFORE their deadline. Otherwise, the group will be automatically **disaffiliated** and lose access to Rubric's features, including but not limited to: event submission, elections, etc.

A detailed breakdown of your registration deadline and submission window can be found here**.**

<table border="1" id="bkmrk-election-month-regis" style="border-collapse: collapse; width: 113.827%; height: 460.179px; border-width: 1px; background-color: #f8fca8; border-color: #DDE625;"><colgroup><col style="width: 28.6784%;"></col><col style="width: 34.3623%;"></col><col style="width: 36.9592%;"></col></colgroup><tbody><tr style="height: 35.3984px;"><td class="align-center" style="height: 35.3984px; border-color: rgb(221, 230, 37);">**ELECTION MONTH**

</td><td class="align-center" style="height: 35.3984px; border-color: rgb(221, 230, 37);">**REGISTRATION OPENS**

</td><td class="align-center" style="height: 35.3984px; border-color: rgb(221, 230, 37);">**REGISTRATION DEADLINE**

</td></tr><tr style="height: 35.3984px;"><td style="height: 35.3984px; border-color: rgb(221, 230, 37);">January

</td><td style="height: 35.3984px; border-color: rgb(221, 230, 37);">January 1st

</td><td style="height: 35.3984px; border-color: rgb(221, 230, 37);">February 28th

</td></tr><tr style="height: 35.3984px;"><td style="height: 35.3984px; border-color: rgb(221, 230, 37);">February

</td><td style="height: 35.3984px; border-color: rgb(221, 230, 37);">February 1st

</td><td style="height: 35.3984px; border-color: rgb(221, 230, 37);">March 31st

</td></tr><tr style="height: 35.3984px;"><td style="height: 35.3984px; border-color: rgb(221, 230, 37);">March

</td><td style="height: 35.3984px; border-color: rgb(221, 230, 37);">March 1st

</td><td style="height: 35.3984px; border-color: rgb(221, 230, 37);">April 30th

</td></tr><tr style="height: 35.3984px;"><td style="height: 35.3984px; border-color: rgb(221, 230, 37);">April

</td><td style="height: 35.3984px; border-color: rgb(221, 230, 37);">April 1st

</td><td style="height: 35.3984px; border-color: rgb(221, 230, 37);">May 31st

</td></tr><tr style="height: 35.3984px;"><td style="height: 35.3984px; border-color: rgb(221, 230, 37);">May

</td><td style="height: 35.3984px; border-color: rgb(221, 230, 37);">May 1st

</td><td style="height: 35.3984px; border-color: rgb(221, 230, 37);">June 30th

</td></tr><tr style="height: 35.3984px;"><td style="height: 35.3984px; border-color: rgb(221, 230, 37);">June

</td><td style="height: 35.3984px; border-color: rgb(221, 230, 37);">June 1st

</td><td style="height: 35.3984px; border-color: rgb(221, 230, 37);">July 31st

</td></tr><tr style="height: 35.3984px;"><td style="height: 35.3984px; border-color: rgb(221, 230, 37);">July

</td><td style="height: 35.3984px; border-color: rgb(221, 230, 37);">July 1st

</td><td style="height: 35.3984px; border-color: rgb(221, 230, 37);">August 31st

</td></tr><tr style="height: 35.3984px;"><td style="height: 35.3984px; border-color: rgb(221, 230, 37);">August

</td><td style="height: 35.3984px; border-color: rgb(221, 230, 37);">August 1st

</td><td style="height: 35.3984px; border-color: rgb(221, 230, 37);">September 30th

</td></tr><tr style="height: 35.3984px;"><td style="height: 35.3984px; border-color: rgb(221, 230, 37);">September

</td><td style="height: 35.3984px; border-color: rgb(221, 230, 37);">September 1st

</td><td style="height: 35.3984px; border-color: rgb(221, 230, 37);">October 31st

</td></tr><tr style="height: 35.3984px;"><td style="height: 35.3984px; border-color: rgb(221, 230, 37);">October

</td><td style="height: 35.3984px; border-color: rgb(221, 230, 37);">October 1st

</td><td style="height: 35.3984px; border-color: rgb(221, 230, 37);">November 30th

</td></tr><tr style="height: 35.3984px;"><td style="height: 35.3984px; border-color: rgb(221, 230, 37);">November

</td><td style="height: 35.3984px; border-color: rgb(221, 230, 37);">November 1st

</td><td style="height: 35.3984px; border-color: rgb(221, 230, 37);">December 31st

</td></tr><tr style="height: 35.3984px;"><td style="height: 35.3984px; border-color: rgb(221, 230, 37);">December

</td><td style="height: 35.3984px; border-color: rgb(221, 230, 37);">December 1st

</td><td style="height: 35.3984px; border-color: rgb(221, 230, 37);">January 31st (Following Year)

</td></tr></tbody></table>

An example is as follows:

- An **Election Month** indicates that your elections are held sometime within that month - in this example it is **April**.
- Your group's **registration form** will open at the beginning of your election month, **two months** before your deadline - in this example it would be **April 1st**.
- Your deadline is set to the last day of the month following your election month. You must have your registration **fully approved** by that day - in this example, it would be **May 31st**.

Registration submissions that do not meet requirements will be **denied for resubmission *without* possibility of extending the original deadline.** We **highly recommend** student groups submit their registrations as soon as possible in case it is initially denied. To optimize your student group registration:

1. The **outgoing** President (or equivalent) can prepare certain sections of the registration beforehand, such as renewing insurance, or receiving a licensing agreement for trademarks &amp; logo.
2. Holding your elections within the **first** **week** of your election month. This allows for additional time to obtain approval, compared to holding your elections at the end of the month.
3. Prepare **transition files and meetings.** This will help your student group pass on knowledge and processes to avoid incomplete or rushed registrations. [An example of transition documents can be found here.](https://docs.su.ualberta.ca/books/student-group-services/page/transition-resources)

<table border="1" class="align-center" id="bkmrk-if-you-are-intereste" style="border-collapse: collapse; width: 76.9136%; height: 71px; border-width: 1px; background-color: #b8e5ff; border-color: #149CEB;"><colgroup><col style="width: 100%;"></col></colgroup><tbody><tr style="height: 29.3906px;"><td class="align-center" style="height: 29.3906px; border-color: rgb(20, 156, 235);">[**For more information about registration, including how to start a new group, visit the Student Group Recognition section of our resource book.**](https://docs.su.ualberta.ca/books/student-group-services/chapter/student-group-recognition)</td></tr></tbody></table>

# Running Elections

To verify election processes and results, it is **expected** that groups complete their annual elections (or byelections) on Rubric. There are a variety of features that allow for full customization, ensuring that your ballot matches both your voter's needs and the regulations outlined in your constitution.

For further explanation regarding democratic procedures, read up on <span style="color: rgb(132, 63, 161);">these resources \[constitution, student group policy, GLO?\]</span>.

### CREATING AN ELECTION

# Constitution Updates

### <span style="color: rgb(20, 156, 235);">Student Group Constitutions</span>

All student groups are required to have a suitable constitution, as determined by Student Group Services. If you need an introduction to constitutions, an explanation of what they are used for, or a template to reference, [check out our constitution resources.](https://drive.google.com/drive/u/0/folders/1vEv2k4_sWnkjROblues2fx2dg24HRy03)

<span id="bkmrk--1"></span>

According to the bylaw 220 and Student Group Operating Policy, your constitution must:

1. Outline the purpose of group;
2. Outline the membership eligibility and standing
3. Outline membership types
4. Outline the executive and membership roles and responsibilities;
5. Demonstrate that the group functions in a democratic manner by outlining the elections process;
6. Outline financial requirements that meet or exceed the University of Alberta Students' Union's requirements as outlined below, and address what will happen to any assets, financial or otherwise, if the group should cease to exist for whatever reason.

If your group would like to make amendments to your constitution, these must be reviewed and approved by Student Group Services before your group votes to approve any changes. **Changes to the constitution will not be held in force until approved by Student Group Services.**

Should an issue arise where a constitution must be consulted only the approved constitution will be held in force. Wherever a constitution comes into conflict or is silent, the relevant regulations of the highest legislative body take precedence. Please see the [student group operating policy](https://docs.su.ualberta.ca/books/operating-policy/page/student-groups) for more details on what constitutes an acceptable constitution.

### <span style="color: rgb(20, 156, 235);">Requesting Review of Constitution Amendments</span>

The first step to request review of your constitution amendments is to login to your student account on [campus.hellorubric.com](https://campus.hellorubric.com/)

1. Click the "Login" drop-down and select **Student Portal**.
2. Login with your **UAlberta email** and password.
3. Click the icon in the upper right-hand corner.
4. From the options, click on the name of your **student** **group** under "Switch Accounts". 
    1. You will now be viewing your club page as a **club executive**.

<p class="callout warning">If you do not have access to switch to your club account, please have your group president follow the [instructions on this page](https://docs.su.ualberta.ca/books/student-group-services/page/executive-team) to assign you as an executive.</p>
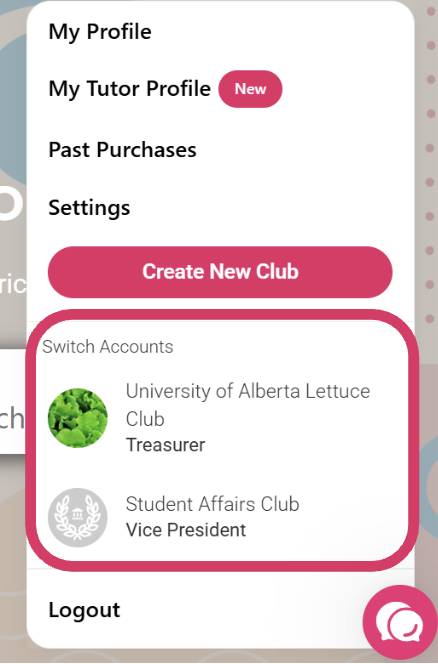
Then, you will need to complete an information update request form.

1. In the upper navigation, click "Forms"
2. On the Forms Overview page, look for the category "Other Forms"
3. Select the " Student Group Information Update Request" form
4. Complete the form, selecting all relevant updates your group requires and uploading the file with amendments.

**Any changes submitted through this form must be reviewed and approved by Student Group Services (SGS) <span data-end="550" data-start="520">prior to being implemented</span>.** Please allow at least two business days for your request to be processed; constitution amendment review may require additional time. A member of the Student Group Services team will review your submission and follow up with an approval or additional guidance, if needed.

### <span style="color: rgb(20, 156, 235);">Finalizing Constitution Amendments</span>

Once your constitution amendments are approved by Student Group Services, you may then bring the proposed amendment(s) to a general membership vote. After being passed by your members, the change may be formally implemented by uploading the new constitution to your group's Rubric account.

1. In the upper navigation, click "Club Files"
2. Click the folder with your club's name
3. Click "Create Folder" and label it "Constitutions." If a folder already exists, please skip this step.
4. Ensure the folder's sharing settings are set to "Clubs Access + Public" by clicking the three dots icon next to the folder name
5. Upload the approved constitution to this folder.
6. Use the title format "\[Group\_Name\]\_Constitution\_\[Year\]\_\[version#\]" to help our team distinguish which group, year, and version is being uploaded. *example: Puppy\_Club\_Constitution\_2025\_v1*

# Events

## <span style="color: rgb(209, 38, 93);">How to Submit an Event for Review through Rubric</span>

<span id="bkmrk--1" style="font-weight: normal;"></span>

1. <span style="font-size: 11pt; font-family: Roboto,sans-serif; color: #000000; background-color: transparent; font-weight: 400; font-style: normal; font-variant: normal; text-decoration: none; vertical-align: baseline; white-space: pre-wrap;">Log in to Rubric (</span>[<span style="font-size: 11pt; font-family: Roboto,sans-serif; color: #1155cc; background-color: transparent; font-weight: 400; font-style: normal; font-variant: normal; text-decoration: underline; -webkit-text-decoration-skip: none; text-decoration-skip-ink: none; vertical-align: baseline; white-space: pre-wrap;">campus.hellorubric.com</span>](http://campus.hellorubric.com)<span style="font-size: 11pt; font-family: Roboto,sans-serif; color: #000000; background-color: transparent; font-weight: 400; font-style: normal; font-variant: normal; text-decoration: none; vertical-align: baseline; white-space: pre-wrap;">) using your CCID and password. </span><span style="font-size: 11pt; font-family: Roboto,sans-serif; color: #000000; background-color: transparent; font-weight: 400; font-style: normal; font-variant: normal; text-decoration: none; vertical-align: baseline; white-space: pre-wrap;">[![Screenshot 2025-09-11 at 3.03.14 PM.png](https://s3.su.ualberta.ca/docs/uploads/images/gallery/2025-09/8outcksvdZlEqb16-screenshot-2025-09-11-at-3-03-14-pm.png)](https://s3.su.ualberta.ca/docs/uploads/images/gallery/2025-09/8outcksvdZlEqb16-screenshot-2025-09-11-at-3-03-14-pm.png)</span>
2. <span style="font-size: 11pt; font-family: Roboto,sans-serif; color: #000000; background-color: transparent; font-weight: 400; font-style: normal; font-variant: normal; text-decoration: none; vertical-align: baseline; white-space: pre-wrap;">In the top right corner, click on the person icon.</span><span style="font-size: 11pt; font-family: Roboto,sans-serif; color: #000000; background-color: transparent; font-weight: bold; font-style: normal; font-variant: normal; text-decoration: none; vertical-align: baseline; white-space: pre-wrap;">  
    </span><span style="font-size: 11pt; font-family: Roboto,sans-serif; color: #000000; background-color: transparent; font-weight: 400; font-style: normal; font-variant: normal; text-decoration: none; vertical-align: baseline; white-space: pre-wrap;">[![Screenshot 2025-09-11 at 2.14.03 PM.png](https://s3.su.ualberta.ca/docs/uploads/images/gallery/2025-09/TvEr2Wmt8NmEC6Sy-screenshot-2025-09-11-at-2-14-03-pm.png)](https://s3.su.ualberta.ca/docs/uploads/images/gallery/2025-09/TvEr2Wmt8NmEC6Sy-screenshot-2025-09-11-at-2-14-03-pm.png)</span>
3. <span style="color: rgb(0, 0, 0);">Under "Switch Accounts" choose the club for which you are submitting an event. If the group you need to submit an event for is not on this list, please contact your group president to be added to the team’s executive roster.</span> [<span style="font-size: 11pt; font-family: Roboto,sans-serif; color: #1155cc; background-color: transparent; font-weight: 400; font-style: normal; font-variant: normal; text-decoration: underline; -webkit-text-decoration-skip: none; text-decoration-skip-ink: none; vertical-align: baseline; white-space: pre-wrap;">They can update your permissions using these instructions.</span>](https://docs.su.ualberta.ca/books/student-group-services/page/executive-team)![Screenshot 2025-09-11 at 2.16.01 PM.png](https://s3.su.ualberta.ca/docs/uploads/images/gallery/2025-09/1cpr7UFYHrx40sGa-screenshot-2025-09-11-at-2-16-01-pm.png)
4. <span style="font-size: 11pt; font-family: Roboto,sans-serif; color: #000000; background-color: transparent; font-weight: 400; font-style: normal; font-variant: normal; text-decoration: none; vertical-align: baseline; white-space: pre-wrap;">Double-check that your student group is affiliated by checking the notifications in the bottom left corner. If your group is not affiliated, you will not be able to submit events. Contact Student Group Services for support with your student group recognition through </span>[<span style="font-size: 11pt; font-family: Roboto,sans-serif; color: #1155cc; background-color: transparent; font-weight: 400; font-style: normal; font-variant: normal; text-decoration: underline; -webkit-text-decoration-skip: none; text-decoration-skip-ink: none; vertical-align: baseline; white-space: pre-wrap;">clubs@uasu.ca</span>](mailto:clubs@uasu.ca)<span style="font-size: 11pt; font-family: Roboto,sans-serif; color: #000000; background-color: transparent; font-weight: 400; font-style: normal; font-variant: normal; text-decoration: none; vertical-align: baseline; white-space: pre-wrap;">.</span><span style="font-size: 11pt; font-family: Roboto,sans-serif; color: #000000; background-color: transparent; font-weight: 400; font-style: normal; font-variant: normal; text-decoration: none; vertical-align: baseline; white-space: pre-wrap;">  
    </span><span style="font-size: 11pt; font-family: Roboto,sans-serif; color: #000000; background-color: transparent; font-weight: 400; font-style: normal; font-variant: normal; text-decoration: none; vertical-align: baseline; white-space: pre-wrap;"> </span>![Screenshot 2025-09-11 at 2.30.03 PM.png](https://s3.su.ualberta.ca/docs/uploads/images/gallery/2025-09/DrdJHBiIthAPqQh7-screenshot-2025-09-11-at-2-30-03-pm.png)
5. <span style="font-size: 11pt; font-family: Roboto,sans-serif; color: #000000; background-color: transparent; font-weight: 400; font-style: normal; font-variant: normal; text-decoration: none; vertical-align: baseline; white-space: pre-wrap;">On the top menu, click "EVENTS 🎉"</span>![Screenshot 2025-09-11 at 2.31.03 PM.png](https://s3.su.ualberta.ca/docs/uploads/images/gallery/2025-09/Dq5UtIYEo17ll3Rs-screenshot-2025-09-11-at-2-31-03-pm.png)
6. <span style="font-size: 11pt; font-family: Roboto,sans-serif; color: #000000; background-color: transparent; font-weight: 400; font-style: normal; font-variant: normal; text-decoration: none; vertical-align: baseline; white-space: pre-wrap;">Click "Create New Event" in the top right corner.</span>
    1. 1. <span style="font-size: 11pt; font-family: Roboto,sans-serif; color: #000000; background-color: transparent; font-weight: 400; font-style: normal; font-variant: normal; text-decoration: none; vertical-align: baseline; white-space: pre-wrap;">Create Event = Hosted by a single student group</span>
        2. <span style="font-size: 11pt; font-family: Roboto,sans-serif; color: #000000; background-color: transparent; font-weight: 400; font-style: normal; font-variant: normal; text-decoration: none; vertical-align: baseline; white-space: pre-wrap;">Create Collaborative Event = Hosted by multiple student groups</span>
    
    [![Screenshot 2025-09-11 at 2.36.22 PM.png](https://s3.su.ualberta.ca/docs/uploads/images/gallery/2025-09/GUylUzaJYo29CGAp-screenshot-2025-09-11-at-2-36-22-pm.png)](https://s3.su.ualberta.ca/docs/uploads/images/gallery/2025-09/GUylUzaJYo29CGAp-screenshot-2025-09-11-at-2-36-22-pm.png)
7. <span style="font-size: 11pt; font-family: Roboto,sans-serif; color: #000000; background-color: transparent; font-weight: 400; font-style: normal; font-variant: normal; text-decoration: none; vertical-align: baseline; white-space: pre-wrap;">Follow the steps in the</span>[<span style="font-size: 11pt; font-family: Roboto,sans-serif; color: #ea2771; background-color: transparent; font-weight: 400; font-style: normal; font-variant: normal; text-decoration: underline; -webkit-text-decoration-skip: none; text-decoration-skip-ink: none; vertical-align: baseline; white-space: pre-wrap;"> </span><span style="font-size: 11pt; font-family: Roboto,sans-serif; color: #ea2771; background-color: transparent; font-weight: bold; font-style: normal; font-variant: normal; text-decoration: underline; -webkit-text-decoration-skip: none; text-decoration-skip-ink: none; vertical-align: baseline; white-space: pre-wrap;">Rubric Event Wizard</span>](https://docs.google.com/document/d/19GAKHOJdVcbT39JZzEqICIirKCBAdClW063LsRq9wqo/edit?tab=t.mk84vm2dh1td#heading=h.9e7y7dxkf83s)<span style="font-size: 11pt; font-family: Roboto,sans-serif; color: #ea2771; background-color: transparent; font-weight: 400; font-style: normal; font-variant: normal; text-decoration: none; vertical-align: baseline; white-space: pre-wrap;"> </span><span style="font-size: 11pt; font-family: Roboto,sans-serif; color: #000000; background-color: transparent; font-weight: 400; font-style: normal; font-variant: normal; text-decoration: none; vertical-align: baseline; white-space: pre-wrap;">to complete the event submission form.</span>
8. <span style="font-size: 11pt; font-family: Roboto,sans-serif; color: #000000; background-color: transparent; font-weight: 400; font-style: normal; font-variant: normal; text-decoration: none; vertical-align: baseline; white-space: pre-wrap;">On the Event Summary page click </span><span style="font-size: 11pt; font-family: Roboto,sans-serif; color: #ea2771; background-color: transparent; font-weight: bold; font-style: normal; font-variant: normal; text-decoration: none; vertical-align: baseline; white-space: pre-wrap;">Publish </span><span style="font-size: 11pt; font-family: Roboto,sans-serif; color: #000000; background-color: transparent; font-weight: 400; font-style: normal; font-variant: normal; text-decoration: none; vertical-align: baseline; white-space: pre-wrap;">to submit your event for review and approval to Student Affairs Advisors in Student Success and Experience.</span>

## <span style="color: rgb(209, 38, 93);">Rubric Event Wizard</span>

<span style="font-size: 11pt; font-family: Roboto,sans-serif; color: #000000; background-color: transparent; font-weight: 400; font-style: normal; font-variant: normal; text-decoration: none; vertical-align: baseline; white-space: pre-wrap;">This section collects the details needed to advertise and promote your event through Rubric. The information you provide will be visible to students browsing upcoming events. You can also use the ticketing feature to sell tickets or to track attendance for free or non-ticketed events.</span>

<div align="center" dir="ltr" id="bkmrk-event-wizard-page-in" style="margin-left: 0pt;"><table style="border: none; border-collapse: collapse; width: 89.1358%;"><thead><tr style="height: 0pt;"><th scope="col" style="vertical-align: top; background-color: rgb(234, 39, 113); padding: 5pt; overflow: hidden; overflow-wrap: break-word; border: 1pt solid rgb(0, 0, 0); width: 28.9908%;"><span style="font-size: 11pt; font-family: Roboto,sans-serif; color: #ffffff; background-color: transparent; font-weight: bold; font-style: normal; font-variant: normal; text-decoration: none; vertical-align: baseline; white-space: pre-wrap;">Event Wizard Page</span>

</th><th scope="col" style="vertical-align: top; background-color: rgb(234, 39, 113); padding: 5pt; overflow: hidden; overflow-wrap: break-word; border: 1pt solid rgb(0, 0, 0); width: 71.0092%;"><span style="font-size: 11pt; font-family: Roboto,sans-serif; color: #ffffff; background-color: transparent; font-weight: bold; font-style: normal; font-variant: normal; text-decoration: none; vertical-align: baseline; white-space: pre-wrap;">Instructions</span>

</th></tr></thead><tbody><tr style="height: 0pt;"><td style="vertical-align: top; padding: 5pt; overflow: hidden; overflow-wrap: break-word; border: 1pt solid rgb(0, 0, 0); width: 28.9908%;">## <span style="font-size: 10pt; font-family: Roboto,sans-serif; color: #000000; background-color: transparent; font-weight: bold; font-style: normal; font-variant: normal; text-decoration: none; vertical-align: baseline; white-space: pre-wrap;">Type of Event</span>

  
</td><td style="vertical-align: top; padding: 5pt; overflow: hidden; overflow-wrap: break-word; border: 1pt solid rgb(0, 0, 0); width: 71.0092%;"><span style="font-size: 11pt; font-family: Roboto,sans-serif; color: #000000; background-color: transparent; font-weight: 400; font-style: normal; font-variant: normal; text-decoration: none; vertical-align: baseline; white-space: pre-wrap;">Select the category that best describes your event. This choice is mainly for promotion and affects how your event will be filtered and displayed on the Rubric website so students can find it easily.</span>

</td></tr><tr style="height: 0pt;"><td style="vertical-align: top; padding: 5pt; overflow: hidden; overflow-wrap: break-word; border: 1pt solid rgb(0, 0, 0); width: 28.9908%;">## <span style="font-size: 10pt; font-family: Roboto,sans-serif; color: #000000; background-color: transparent; font-weight: bold; font-style: normal; font-variant: normal; text-decoration: none; vertical-align: baseline; white-space: pre-wrap;">Event Information</span>

</td><td style="vertical-align: top; padding: 5pt; overflow: hidden; overflow-wrap: break-word; border: 1pt solid rgb(0, 0, 0); width: 71.0092%;"><span style="font-size: 11pt; font-family: Roboto,sans-serif; color: #000000; background-color: transparent; font-weight: 400; font-style: normal; font-variant: normal; text-decoration: none; vertical-align: baseline; white-space: pre-wrap;">This page collects the basic details of your event. You’ll enter the event name, date and time, location (or online link), and upload a promo banner. You’ll also provide a short description that tells students what the event is about and why they should attend.</span>

  
<span style="font-size: 11pt; font-family: Roboto,sans-serif; color: #000000; background-color: transparent; font-weight: 400; font-style: normal; font-variant: normal; text-decoration: none; vertical-align: baseline; white-space: pre-wrap;">Optional fields let you add extra information such as a Facebook event link, refund policy, or terms and conditions. </span>

<span style="font-size: 11pt; font-family: Roboto,sans-serif; color: #000000; background-color: transparent; font-weight: 400; font-style: normal; font-variant: normal; text-decoration: none; vertical-align: baseline; white-space: pre-wrap;">When creating or editing an event, you will now see a new option:</span>

- <span style="font-size: 11pt; font-family: Roboto,sans-serif; color: #000000; background-color: transparent; font-weight: 400; font-style: normal; font-variant: normal; text-decoration: none; vertical-align: baseline; white-space: pre-wrap;">Is your event private? - enabling this setting makes the event private </span>

<span style="font-size: 11pt; font-family: Roboto,sans-serif; color: #000000; background-color: transparent; font-weight: 400; font-style: normal; font-variant: normal; text-decoration: none; vertical-align: baseline; white-space: pre-wrap;">When this option is turned on, the event will not appear in any public menus or search results within the Campus Portal. You can share the event directly through the unique event link.</span>

  
<span style="font-size: 11pt; font-family: Roboto,sans-serif; color: #000000; background-color: transparent; font-weight: 400; font-style: normal; font-variant: normal; text-decoration: none; vertical-align: baseline; white-space: pre-wrap;">For detailed instructions, visit the</span>[<span style="font-size: 11pt; font-family: Roboto,sans-serif; color: #1155cc; background-color: transparent; font-weight: 400; font-style: normal; font-variant: normal; text-decoration: underline; -webkit-text-decoration-skip: none; text-decoration-skip-ink: none; vertical-align: baseline; white-space: pre-wrap;"> Rubric Help Center guide on creating an event</span>](https://helpcenter.hellorubric.com/articles/7281219-how-to-create-an-event#mr42cqq7qcp)<span style="font-size: 11pt; font-family: Roboto,sans-serif; color: #000000; background-color: transparent; font-weight: 400; font-style: normal; font-variant: normal; text-decoration: none; vertical-align: baseline; white-space: pre-wrap;">.</span>

</td></tr><tr style="height: 0pt;"><td style="vertical-align: top; padding: 5pt; overflow: hidden; overflow-wrap: break-word; border: 1pt solid rgb(0, 0, 0); width: 28.9908%;">## <span style="font-size: 10pt; font-family: Roboto,sans-serif; color: #000000; background-color: transparent; font-weight: bold; font-style: normal; font-variant: normal; text-decoration: none; vertical-align: baseline; white-space: pre-wrap;">Tickets</span>

  
</td><td style="vertical-align: top; padding: 5pt; overflow: hidden; overflow-wrap: break-word; border: 1pt solid rgb(0, 0, 0); width: 71.0092%;"><span style="font-size: 11pt; font-family: Roboto,sans-serif; color: #000000; background-color: transparent; font-weight: 400; font-style: normal; font-variant: normal; text-decoration: none; vertical-align: baseline; white-space: pre-wrap;">This page lets you set up tickets for your event. You can create free or paid tickets, limit the number available, and set sales start and end dates.</span>

  
<span style="font-size: 11pt; font-family: Roboto,sans-serif; color: #000000; background-color: transparent; font-weight: 400; font-style: normal; font-variant: normal; text-decoration: none; vertical-align: baseline; white-space: pre-wrap;">Since tickets cannot be disabled in Rubric, student groups not using tickets should create a placeholder ticket called “Not Applicable” with a price of $0.00.</span>

  
<span style="font-size: 11pt; font-family: Roboto,sans-serif; color: #000000; background-color: transparent; font-weight: 400; font-style: normal; font-variant: normal; text-decoration: none; vertical-align: baseline; white-space: pre-wrap;">For detailed instructions, visit the</span>[<span style="font-size: 11pt; font-family: Roboto,sans-serif; color: #1155cc; background-color: transparent; font-weight: 400; font-style: normal; font-variant: normal; text-decoration: underline; -webkit-text-decoration-skip: none; text-decoration-skip-ink: none; vertical-align: baseline; white-space: pre-wrap;"> Rubric Help Center guide on creating tickets</span>](https://helpcenter.hellorubric.com/articles/7281219-how-to-create-an-event#3epofbibzae)<span style="font-size: 11pt; font-family: Roboto,sans-serif; color: #000000; background-color: transparent; font-weight: 400; font-style: normal; font-variant: normal; text-decoration: none; vertical-align: baseline; white-space: pre-wrap;">.</span>

</td></tr><tr style="height: 126.75pt;"><td style="vertical-align: top; padding: 5pt; overflow: hidden; overflow-wrap: break-word; border: 1pt solid rgb(0, 0, 0); width: 28.9908%;">## <span style="font-size: 10pt; font-family: Roboto,sans-serif; color: #000000; background-color: transparent; font-weight: bold; font-style: normal; font-variant: normal; text-decoration: none; vertical-align: baseline; white-space: pre-wrap;">University of Alberta Students' Union Questions</span>

  
</td><td style="vertical-align: top; padding: 5pt; overflow: hidden; overflow-wrap: break-word; border: 1pt solid rgb(0, 0, 0); width: 71.0092%;"><span style="font-size: 11pt; font-family: Roboto,sans-serif; color: #000000; background-color: transparent; font-weight: 400; font-style: normal; font-variant: normal; text-decoration: none; vertical-align: baseline; white-space: pre-wrap;">This section of the form is reviewed by a Student Affairs Advisor or SGS staff to support your group and address event risk management considerations. </span>

  
<span style="font-size: 11pt; font-family: Roboto,sans-serif; color: #000000; background-color: transparent; font-weight: 400; font-style: normal; font-variant: normal; text-decoration: none; vertical-align: baseline; white-space: pre-wrap;">A full list of the questions in this section is provided later in this document (</span>[<span style="font-size: 11pt; font-family: Roboto,sans-serif; color: #1155cc; background-color: transparent; font-weight: 400; font-style: normal; font-variant: normal; text-decoration: underline; -webkit-text-decoration-skip: none; text-decoration-skip-ink: none; vertical-align: baseline; white-space: pre-wrap;">see ‘Preview of Event Form Questions’</span>](https://docs.google.com/document/d/19GAKHOJdVcbT39JZzEqICIirKCBAdClW063LsRq9wqo/edit?tab=t.mk84vm2dh1td#heading=h.hfgafucqwtjo)<span style="font-size: 11pt; font-family: Roboto,sans-serif; color: #000000; background-color: transparent; font-weight: 400; font-style: normal; font-variant: normal; text-decoration: none; vertical-align: baseline; white-space: pre-wrap;">).</span>

</td></tr><tr style="height: 0pt;"><td style="vertical-align: top; padding: 5pt; overflow: hidden; overflow-wrap: break-word; border: 1pt solid rgb(0, 0, 0); width: 28.9908%;">## <span style="font-size: 10pt; font-family: Roboto,sans-serif; color: #000000; background-color: transparent; font-weight: bold; font-style: normal; font-variant: normal; text-decoration: none; vertical-align: baseline; white-space: pre-wrap;">Upsell Merchandise</span>

  
</td><td style="vertical-align: top; padding: 5pt; overflow: hidden; overflow-wrap: break-word; border: 1pt solid rgb(0, 0, 0); width: 71.0092%;"><span style="font-size: 11pt; font-family: Roboto,sans-serif; color: #000000; background-color: transparent; font-weight: 400; font-style: normal; font-variant: normal; text-decoration: none; vertical-align: baseline; white-space: pre-wrap;">Rubric includes a merchandise feature that allows student groups to sell items like shirts, hoodies, or other gear online.</span>

  
<span style="font-size: 11pt; font-family: Roboto,sans-serif; color: #000000; background-color: transparent; font-weight: bold; font-style: normal; font-variant: normal; text-decoration: none; vertical-align: baseline; white-space: pre-wrap;">This feature is not enabled at the University of Alberta</span><span style="font-size: 11pt; font-family: Roboto,sans-serif; color: #000000; background-color: transparent; font-weight: 400; font-style: normal; font-variant: normal; text-decoration: none; vertical-align: baseline; white-space: pre-wrap;">, so you can skip this page when completing your event submission by clicking next.</span>

</td></tr><tr style="height: 0pt;"><td style="vertical-align: top; padding: 5pt; overflow: hidden; overflow-wrap: break-word; border: 1pt solid rgb(0, 0, 0); width: 28.9908%;">## <span style="font-size: 10pt; font-family: Roboto,sans-serif; color: #000000; background-color: transparent; font-weight: bold; font-style: normal; font-variant: normal; text-decoration: none; vertical-align: baseline; white-space: pre-wrap;">Event Summary</span>

  
</td><td style="vertical-align: top; padding: 5pt; overflow: hidden; overflow-wrap: break-word; border: 1pt solid rgb(0, 0, 0); width: 71.0092%;"><span style="font-size: 11pt; font-family: Roboto,sans-serif; color: #000000; background-color: transparent; font-weight: 400; font-style: normal; font-variant: normal; text-decoration: none; vertical-align: baseline; white-space: pre-wrap;">This is the final review page before submitting your event. Double-check your event details, ticket setup, and any other information you’ve entered.</span>

  
<span style="font-size: 11pt; font-family: Roboto,sans-serif; color: #000000; background-color: transparent; font-weight: 400; font-style: normal; font-variant: normal; text-decoration: none; vertical-align: baseline; white-space: pre-wrap;">To complete your submission, you must click Publish. If the event is not published, it will not appear in the Student Affairs Advisors’ queue for review.</span>

  
<span style="font-size: 11pt; font-family: Roboto,sans-serif; color: #000000; background-color: transparent; font-weight: 400; font-style: normal; font-variant: normal; text-decoration: none; vertical-align: baseline; white-space: pre-wrap;">For more guidance, visit the</span>[<span style="font-size: 11pt; font-family: Roboto,sans-serif; color: #1155cc; background-color: transparent; font-weight: 400; font-style: normal; font-variant: normal; text-decoration: underline; -webkit-text-decoration-skip: none; text-decoration-skip-ink: none; vertical-align: baseline; white-space: pre-wrap;"> Rubric Help Center guide on the event summary page</span>](https://helpcenter.hellorubric.com/articles/7281219-how-to-create-an-event#0lqmsrii4t6)<span style="font-size: 11pt; font-family: Roboto,sans-serif; color: #000000; background-color: transparent; font-weight: 400; font-style: normal; font-variant: normal; text-decoration: none; vertical-align: baseline; white-space: pre-wrap;">.</span>

</td></tr></tbody></table>

</div>
## <span style="color: rgb(209, 38, 93);">How to Make Changes to an Event Submission in Rubric</span>

### <span style="text-decoration: underline; color: rgb(53, 152, 219);">Resubmit an Approved Event</span>

<span style="color: rgb(0, 0, 0);">Your event was previously approved, but updates are needed. Please make the required changes and re-submit for a quick review. Follow the steps below:</span>

1. <span style="color: rgb(0, 0, 0);">Log in to **Rubric** using your CCID and password.</span>
2. <span style="color: rgb(0, 0, 0);">Click the **person icon** in the top right corner.</span>
3. <span style="color: rgb(0, 0, 0);">Under **Switch Accounts**, select the club associated with the event.</span>
4. <span style="color: rgb(0, 0, 0);">From the top menu, click **EVENTS** 🎉.</span>
5. <span style="color: rgb(0, 0, 0);">Under **Events in 2025**, find your event and click the 📝 **Edit** icon.</span>
6. <span style="color: rgb(0, 0, 0);">When the “**Reapproval Required**” pop-up appears, click the **X** to close it.</span>
7. <span style="color: rgb(0, 0, 0);">Make the necessary changes to your event details.</span>
8. <span style="color: rgb(0, 0, 0);">On the **Event Summary** page, click **Publish** to resubmit your event.</span>

### <span style="text-decoration: underline; color: rgb(53, 152, 219);">Resubmit a Pending Union Approval Event</span>

<span style="color: rgb(0, 0, 0);">Your event is currently under review and awaiting a response. If you need to make changes before a decision is made, follow these steps:</span>

1. <span style="color: rgb(0, 0, 0);">Log in to **Rubric** using your CCID and password.</span>
2. <span style="color: rgb(0, 0, 0);">Click the **person icon** in the top right corner.</span>
3. <span style="color: rgb(0, 0, 0);">Under **Switch Accounts**, select the club associated with the event.</span>
4. <span style="color: rgb(0, 0, 0);">From the top menu, click **EVENTS** 🎉.</span>
5. <span style="color: rgb(0, 0, 0);">Under **Draft Events**, find your event and click **Edit Draft**.</span>
6. <span style="color: rgb(0, 0, 0);">When the “**Reapproval Required**” pop-up appears, click the **X** to close it.</span>
7. <span style="color: rgb(0, 0, 0);">Make the necessary changes to your event details.</span>
8. <span style="color: rgb(0, 0, 0);">On the **Event Summary** page, click **Publish** to resubmit your event.</span>

### <span style="text-decoration: underline; color: rgb(53, 152, 219);">Resubmit a Denied Event</span>

<span style="color: rgb(0, 0, 0);">Your event was denied, but you can revise and re-submit it without starting from scratch. To update and resubmit for review, follow the steps below:</span>

1. <span style="color: rgb(0, 0, 0);">Log in to **Rubric** using your CCID and password.</span>
2. <span style="color: rgb(0, 0, 0);">Click the **person ico**n in the top right corner.</span>
3. <span style="color: rgb(0, 0, 0);">Under **Switch Accounts**, select the club associated with the event.</span>
4. <span style="color: rgb(0, 0, 0);">From the top menu, click **EVENTS** 🎉.</span>
5. <span style="color: rgb(0, 0, 0);">Under **Draft Events**, find your event and click **Edit Draft**.</span>
6. <span style="color: rgb(0, 0, 0);">When the “**Reapproval Required**” pop-up appears, click the **X** to close it.</span>
7. <span style="color: rgb(0, 0, 0);">Make the necessary changes to your event details.</span>
8. <span style="color: rgb(0, 0, 0);">On the **Event Summary** page, click **Publish** to resubmit your event.</span>

## <span style="color: rgb(209, 38, 93);">How to Create Recurring Events Using Duplicate</span>

<span style="color: rgb(0, 0, 0);">If you're planning an event that occurs on multiple dates (e.g. weekly meetings, workshops, or classes), you can submit each date by duplicating your original event. Follow these steps:</span>

### <span style="text-decoration: underline; color: rgb(53, 152, 219);">Step 1: Submit the First Event</span>

1. <span style="color: rgb(0, 0, 0);">Log in to **Rubric** using your CCID and password.</span>
2. <span style="color: rgb(0, 0, 0);">Click the **person icon** in the top right corner.</span>
3. <span style="color: rgb(0, 0, 0);">Under **Switch Accounts**, select the club associated with the event.</span>
4. <span style="color: rgb(0, 0, 0);">From the top menu, click **EVENTS** 🎉.</span>
5. <span style="color: rgb(0, 0, 0);">Click **Create New Event** in the top right corner.</span>
    - <span style="color: rgb(0, 0, 0);">Select **Create Event** (for single group-hosted events) or</span>
    - <span style="color: rgb(0, 0, 0);">**Create Collaborative Event** (for events hosted by multiple student groups).</span>
6. <span style="color: rgb(0, 0, 0);">Complete the event form in full.</span>
    - <span style="color: rgb(0, 0, 0);">You may mention recurring dates in the description for awareness,</span>  
        <span style="color: rgb(0, 0, 0);">but **each date must be submitted as a separate event.**</span>
7. <span style="color: rgb(0, 0, 0);">Click **Publish** to submit your event for review and approval.</span>

### <span style="text-decoration: underline; color: rgb(53, 152, 219);">Step 2: Duplicate for Additional Dates</span>

1. <span style="color: rgb(0, 0, 0);">Once the first event is submitted, you’ll land on the "**Event successfully created!**" page.</span>
2. <span style="color: rgb(0, 0, 0);">Under Event Actions, click **Duplicate Event**.</span>
3. <span style="color: rgb(0, 0, 0);">When the “**Reapproval Required**” pop-up appears, click the **X** to close it.</span>
4. <span style="color: rgb(0, 0, 0);">Update the duplicated event:</span>
    - <span style="color: rgb(0, 0, 0);">**Remove “\[duplicate\]”** from the event title</span>
    - <span style="color: rgb(0, 0, 0);">**Change the start date and time** to reflect the new occurrence</span>
    - <span style="color: rgb(0, 0, 0);">**Make any other necessary updates** (for example, if you have a different speaker, topic, or location for each week)</span>
5. <span style="color: rgb(0, 0, 0);">Click **Publish** to submit this new event.</span>
6. <span style="color: rgb(0, 0, 0);">Repeat these steps for each additional date.</span>

<div class="" id="bkmrk-for-all-further-info"><div class=""><table border="1" class="align-center" id="bkmrk-learn-more-about-low" style="border-collapse: collapse; width: 80.3704%; height: 122px; border-width: 1px; background-color: rgb(184, 229, 255); border-color: rgb(20, 156, 235);"><colgroup><col style="width: 100%;"></col></colgroup><tbody><tr style="height: 85.7812px;"><td class="align-center" style="height: 85.7812px; border-color: rgb(20, 156, 235); padding: 20px;">#### For all further information, please refer to 

#### <span style="text-decoration: underline;"><span style="color: rgb(53, 152, 219); text-decoration: underline;">**[Student Group Event Submission &amp; Form Preview Guide](https://docs.google.com/document/d/1WsHSqGYkWtzhzcjzGadqtgM5_VKuxYcFyKqmeQj2HU8/edit?tab=t.mk84vm2dh1td)**</span></span>

</td></tr></tbody></table>

</div></div>

# Rubric Forms

On Rubric, Student Group Services offers a plethora of *Forms* to assist with ongoing group operations. Including changes to constitutions, banking letters, granting requests, and more. On this page, we'll be going over how to submit forms and the different kinds of forms offered.

It is highly recommended that groups have <span style="color: rgb(224, 62, 45);">**email notifications ON**</span> for Rubric updates. This ensures that groups recieves their requested documents or important messages from Student Group Services regarding submissions.

### <span style="color: rgb(53, 152, 219);">Navigating Forms</span>

To access the *Forms* feature for your student group, log in via your user account and switch to the **club management page**. If you are not set up as a club executive, [refer to this page.](https://docs.su.ualberta.ca/books/student-group-services/page/executive-team)

1. On [https://campus.hellorubric.com/](https://campus.hellorubric.com/), click on "Login"
2. Login with your **UAlberta email** and password.
3. Click on the icon in the top-right of the screen
4. Click on the name of your club.
5. Using the **top navigation bar** on the club management page, click on **Forms**.

If done correctly, the page should look something like this:

[![Screenshot 2026-04-08 at 1.17.54 PM.png](https://s3.su.ualberta.ca/docs/uploads/images/gallery/2026-04/gVoksajUBruxcoBR-screenshot-2026-04-08-at-1-17-54-pm.png)](https://s3.su.ualberta.ca/docs/uploads/images/gallery/2026-04/gVoksajUBruxcoBR-screenshot-2026-04-08-at-1-17-54-pm.png)

The forms we'll be discussing are part of the "Other Forms" category. For details regarding re-registration (affiliation) forms, <span style="color: rgb(53, 152, 219);">[feel free to check out this page.](https://docs.su.ualberta.ca/books/student-group-services/chapter/student-group-recognition)</span>

#### Finding Drafts &amp; Pending Submissions

Once you've clicked on a form - Rubric will create a unique submission ID (multi-digit number) that can be accessed at any point. Regardless if it's only a draft, or has been fully submitted. To access these forms...

1. Navigate to the *Forms* module on Rubric.
2. On the left-hand side bar, click on "Submissions"

From there, you will have multiple tables displaying your different submissions. Whether they are drafted, approved, pending or **denied**. For the latter, a new specialty table labeled 'Action Required' will show up at the top of the screen. You will be able to view the denial, as well as any comments left by SGS staff members.

Now that we know how to submit and find previous submissions, lets go over the various forms available on Rubric.

---

#### Student Group Information Update Request Form

Student Groups that wish to update integral information about their organization, such as their constitution, name, or election month, can submit an *Information Update Request* (IUR) to ensure their changes are in compliance with all relevant policies.

Once you have accessed the *Forms* module on Rubric, click on 'Student Group Information Update Request Form'. The first question in the form will prompt you to select the purpose of your submission - you can select **multiple** at once.

##### (1) Organization Name (or) Acronym

If a group wishes to change their organization name or acronym (or, logo) they need to first submit a request to Student Group Services to ensure it meets compliance. During review, it is important to note that any usage of **University of Alberta Trademarks** must be reviewed by the **Office of Trademarks &amp; Liscensing (T&amp;L)**.

To help your submission go faster, or pre-emptively before your annual re-registration, [<span style="color: rgb(53, 152, 219);">check out this page</span>](https://www.ualberta.ca/en/toolkit/trademarks-licensing/student-groups.html) for what expectations exist for student groups. As well, how to get in contact with the Office of T&amp;L.

##### (2) Banking Details

If a group has major banking detail updates (such as primary bank location changes) they must report it via the IUR form.

##### (3) Election Month

If a group is wanting to switch their *annual* election month, they need to do so in a **timely** manner dependant on their current election month. For example, a group with April elections that submits an election month switch during the month of April will still need to complete an approved re-registration before their current deadline. Failure to do so will temporarily disaffiliate a group, suspending student group benefits until the re-registration is approved. An election month switch only affects the **following** (next year) deadline.

When considering changing your election month, it is **extremely** important to consider all elements regarding transitional periods. Some questions to ask your team before making the decision:

1. How will this change reflect your recruitment of new members?
2. How will this change influence the effectiveness of transitioning new incoming executives?
3. How much buy-in and initiative will your members showcase in this new month?
4. Are there any additional calendar-conflicts (i.e. finals, events, etc) that may decease the band-width available to host elections?

##### (4) Constitution Update Request Form

If a group is requesting alterations to their *last approved* constitution, they must submit a document indicating such changes using the IUR. Those changes must be highlighted or clearly formatted. If anything is out of compliance, an SGS staff member will deny the submission with a link to comments of required changes. Any group found to have made changes to their constitution *without* approval will have those changes not upheld.

#### Verification Letter Request Form

Student Groups that have outlined financial practices (written in their constitution) are able to request *Verification Letters* to assist with transitions, grant reports, or general banking processes. Student Group Services reserves the right to request additional information as needed to fulfill the request, or to clarify any points of concern.

Once you have accessed the *Forms* module on Rubric, click on 'Verification Letter Request Form.' The second question in the form will prompt you to select the purpose of your submission - you can select **multiple** at once. Although each of these options have their own required information, if any additional fields are needed, you can fill out the section at the very end.

##### (1) Opening a Bank Account

If your **affiliated** group has yet to open a community bank account, you can request one via this option. Note that you must have a minimum of two, no more than four signing authorities. These privileges must be assigned to elected, student-held (executive) positions. The bank must be selected prior to your request, and we recommend reaching out to bank branches (such as BMO, Scotiabank, CIBC) to see what options they offer.

It is also important to note that if you are **transferring** between banks - you will need this letter, as well as an additional 'Other' letter to express to the old banking branch that the account is to be closed.

##### (2) Transferring Signing Authorities

On an annual basis, incoming executive will need authority over the group's bank account to complete financial processes. This can be requested **after** a group's annual re-registration is completed, or in specific circumstances (i.e. a by-election) so long as there is evidential support.

When submitting this request, ensure you have the full **legal** name of the outgoing signing authorities, as well as the incoming signing authorities. Banks typically request signatures of all parties, as well as government-issued ID to verify the executives.

##### (3) Award/Granting Applications

For groups looking for external revenue streams such as UASU or GSA grants, SGS can provide a letter outlining the group's affiliations status with the University of Alberta. Note that, this is only offered to currently **affiliated** groups. As in, a group's most recently completed annual re-registration must have been approved within the last year.

##### (4) Other

For any other banking inquiries not outlined by the three previous options, groups are encouraged to fill out this form with any applicable information.

#### Other (Conditional) Forms

A variety of forms are available dependant on the time of year, your group type, or general availability. A brief outline of the most frequently seen 'other' forms has been featured below for reference:

<table border="1" id="bkmrk-student-group-storag" style="border-collapse: collapse; width: 100%; height: 324.149px;"><colgroup><col style="width: 23.4898%;"></col><col style="width: 76.5102%;"></col></colgroup><tbody><tr style="height: 82.5938px;"><td style="height: 82.5938px;">**Student Group Storage Space Application**</td><td style="height: 82.5938px;">There are two types of storage applications. Annual long-term storage and Conditional short-term Storage. Both are subject to availability and are only for UASU-affiliated groups. Details of our student group storage program <span style="color: rgb(53, 152, 219);">[can be found here.](https://docs.su.ualberta.ca/books/student-group-services/page/storage-rentals)</span>

</td></tr><tr style="height: 80.1953px;"><td style="height: 80.1953px;">**Student Group Granting**</td><td style="height: 80.1953px;">**\[SEASONAL\]** Semesterly intake cycles for granting are available for UASU-affiliated groups, with specific types based on how the money is predicted to be spent. Details of our student granting program, including deadlines, [<span style="color: rgb(53, 152, 219);">can be found here.</span>](https://docs.su.ualberta.ca/books/student-group-services/chapter/student-group-funding)

</td></tr><tr style="height: 80.5938px;"><td style="height: 80.5938px;">**Granting Report Forms**</td><td style="height: 80.5938px;">**\[CONDITIONAL\]** When a group recieves a grant, it is the group's responsibility to submit a detailed financial report of the money spent based on the grant awarded. Details of our student group granting program [<span style="color: rgb(53, 152, 219);">can be found here.</span>](https://docs.su.ualberta.ca/books/student-group-services/chapter/student-group-funding)

</td></tr><tr><td>**SGS Bi-weekly Newsletter Submission Form**</td><td>**\[CONDITIONAL\]** Affiliated student groups are able to submit content to be featured in the *bi-weekly* SGS Newsletter. This email is sent year-round to all subscribed members on our Rubric pages, including student-group executives and the general student body.

</td></tr></tbody></table>